Introduction
CAIMAN-ASR provides high-throughput and low-latency automatic speech recognition (ASR).
This document outlines the following:
Installation
The latest release is available for download from https://github.com/MyrtleSoftware/caiman-asr/releases.
This provides the following package:
- ML training repo
- Live demo client
The following packages can be obtained by contacting Myrtle.ai at caiman-asr@myrtle.ai:
- CAIMAN-ASR server:
caiman-asr-server-<version>.run - CAIMAN-ASR demo:
caiman-asr-demo-<version>.run - Performance testing client:
caiman-asr-client-<version>.run - Model weights
A .run file is a self-extractable archive; download and execute it to extract the contents to the current directory.
Key Features
CAIMAN-ASR enables at-scale automatic speech recognition (ASR), supporting up to 2000 real-time streams per accelerator card.

Lowest end-to-end latency
CAIMAN-ASR leverages the parallel processing advantages of Achronix’s Speedster7t® FPGA, the power behind the accelerator cards, to achieve extremely low latency inference. This enables NLP workloads to be performed in a human-like response time for end-to-end conversational AI.
Simple to integrate into existing systems
CAIMAN-ASR’s Websocket API can be easily connected to your service.
Scale up rapidly & easily
CAIMAN-ASR runs on industry-standard PCIe accelerator cards, enabling existing racks to be upgraded quickly for up to 20x greater call capacity. The VectorPath® S7t-VG6 accelerator card from BittWare is available off-the-shelf today.
Efficient inference, at scale
CAIMAN-ASR uses as much as 90% less energy to process the same number of real-time streams as an unaccelerated solution, significantly reducing energy costs and enhancing ESG (environmental, social, and governance) credentials.
Streaming transcription
CAIMAN-ASR is provided pre-trained for punctuated and cased English language transcription. For applications requiring specialist vocabularies or alternative languages, the neural model can easily be retrained with customers’ own bespoke datasets using the ML framework PyTorch.
Model Configurations
The solution supports two models: base and large of sizes 85M and 196M parameters respectively. These can be decoded with various configurations that trade off accuracy with latency and throughput. These trade-offs are described in more detail in the performance page but the ‘fastest’ and ‘most accurate’ configurations are summarized below:
| Description | Model | Parameters | Decoding | RTS | CL99 at max RTS | CL99 at RTS=32 | median UPL | HF Leaderboard WER |
|---|---|---|---|---|---|---|---|---|
| fastest | base | 85M | greedy | 2000 | 25 ms | 15 ms | 147 ms | 10.43% |
| most-accurate | large | 196M | beam, width=4 | 500 | 40 ms | 20 ms | 158 ms | 7.92% |
where:
- Realtime streams (RTS) is the number of concurrent streams that can be serviced by a single accelerator using default settings
- Compute latency 99th-percentile (CL99) is the 99th-percentile compute latency, which measures how long it takes for a model to make a prediction for one audio frame.
- User-perceived latency (UPL) is the time difference between when the user finishes saying a word and when it is returned as a transcript by the system.
- WER is the Word Error Rate, a measure of the accuracy of the model. Lower is better.
- HF Leaderboard WER is the WER of the model on the Huggingface Open ASR Leaderboard. WER is averaged across the test datasets.
The solution scales linearly up to 8 accelerators, and a single server has been measured to support 16000 RTS with the base model.
Product Overview
The CAIMAN-ASR solution is used via a websocket interface. Clients send audio data in chunks to the server, which returns transcriptions.
Components of the solution
-
CAIMAN-ASR bitstream: this is the bitstream that is flashed onto the FPGA. This bitstream supports all of the ML model architectures (for more details on the architectures, see the Models section). This only needs to be reprogrammed when a new update is released.
-
CAIMAN-ASR program: This contains the model weights and the instructions for a particular model architecture (e.g. base, large). It is loaded at runtime. The program is compiled from the
hardware-checkpointproduced during training. For more details on how to compile the CAIMAN-ASR program, see Compiling weights. Pre-trained weights are provided for English-language transcription for the base and large architectures. -
CAIMAN-ASR server: This provides a websocket interface for using the solution. It handles loading the program and communicating to and from the card. One server controls one card; if you have multiple cards, you can run multiple servers and use load-balancing.
-
ML training repository: This allows the user to train their own models, validate on their own data, and export model weights for the server.
An example configuration of CAIMAN-ASR is as follows:

Performance
The solution has various configurations that trade off accuracy and performance. In this page:
- Realtime streams (RTS) is the number of concurrent streams that can be serviced by a single accelerator using default settings.
- Compute latency 99th-percentile (CL99) is the 99th-percentile compute latency, which measures how long it takes for a model to make a prediction for one audio frame. Note that CL99 increases with the number of concurrent streams.
- User-perceived latency (UPL) is the time difference between when the user finishes saying a word and when it is returned as a transcript by the system.
- WER is the Word Error Rate, a measure of the accuracy of the model. Lower is better.
- HF Leaderboard WER is the WER of the model on the Huggingface Open ASR Leaderboard. WER is averaged across 8 test datasets.
The WERs in the following section are for models trained on 154k hours of mostly open-source data described at the bottom of this page.
The UPL were computed by streaming librispeech-dev-clean audio live to an FPGA backend server on-site. Please refer to this document for more details on latencies.
Without state resets
The solution supports decoding with a beam search (default beam width=4) with an n-gram language model for improved accuracy. The solution supports greedy decoding for higher throughput.
| Model | Parameters | Decoding | RTS | CL99 at max RTS | median UPL | HF Leaderboard WER | Earnings21 WER |
|---|---|---|---|---|---|---|---|
base | 85M | greedy | 2000 | 25 ms | 147 ms | 10.43% | 20.87% |
base | 85M | beam, width=4 | 1300 | 80 ms | - | 9.03% | 14.09% |
large | 196M | greedy | 800 | 25 ms | - | 8.99% | 34.26% |
large | 196M | beam, width=4 | 500 | 40 ms | 158 ms | 7.92% | 23.74% |
State resets
State resets is a technique that improves the accuracy on long utterances (over 60s) by resetting the model’s hidden state after a fixed duration. This reduces the number of real-time streams that can be supported by around 25%:
| Model | Parameters | Decoding | RTS | CL99 at max RTS | median UPL | HF Leaderboard WER | Earnings21 WER |
|---|---|---|---|---|---|---|---|
base | 85M | greedy | 1600 | 45 ms | 147 ms | 10.43% | 15.41% |
base | 85M | beam, width=4 | 1200 | 50 ms | - | 9.02% | 12.87% |
large | 196M | greedy | 650 | 55 ms | - | 8.99% | 13.54% |
large | 196M | beam, width=4 | 400 | 60 ms | 158 ms | 7.93% | 11.37% |
Note that most of the data in the HuggingFace Leaderboard is less than 60s long so the impact of state resets is not reflected in the leaderboard WER. The average duration of audio in Earnings21 is ~54 minutes, making it a more representative benchmark for evaluating the impact of state resets on long-form transcription accuracy.
Since the UPL numbers were computed from librispeech-dev-clean, the effect of state resets is not reflected in measured latencies.
WER test set breakdown
The WER breakdown across the HuggingFace Leaderboard is shown for the ‘highest-throughput’ and ‘most-accurate’ configurations in the table below:
| Model Configuration | AVERAGE | AMI | E22 (segmented) | Gigaspeech | LS test clean | LS test other | SPGISpeech | TED-LIUM | VoxPopuli |
|---|---|---|---|---|---|---|---|---|---|
| base (greedy) | 10.43% | 14.82% | 17.36% | 14.41% | 3.83% | 9.38% | 6.06% | 6.78% | 10.83% |
| large (beam=4) | 7.92% | 11.46% | 13.24% | 11.52% | 2.59% | 6.66% | 4.38% | 4.95% | 8.53% |
154k hour dataset
The models above were trained on 154k hrs of mostly open-source training data consisting of:
- Emilia-YODAS: 93k hours of YODAS; filtered and transcribed with Emilia-Pipe.
- YODAS: 19k hour subset of YODAS manual English subset filtered for transcription quality.
- Peoples’ Speech: A 9.4k hour subset filtered for transcription quality.
- Unsupervised Peoples’ Speech: A 17k hour subset of unsupervised Peoples’ Speech; automatically labelled.
- NPTEL: 570 hour subset of NPTEL2000, filtered for transcription quality.
- VoxPopuli: 500 hours.
- Unsupervised VoxPopuli: 8.6k hrs subset of unsupervised VoxPopuli; automatically labelled.
- National Speech Corpus: 980 hour subset; automatically labelled and filtered for transcription quality.
- LibriSpeech: 960 hours.
- Common Voice 17.0: 1.7k hours
- MLS: 961 hours.
- Spoken Wikipedia Corpora: 350 hours.
- AMI: 155 hours.
Additionally, we used 550 hrs of TTS-generated speech data targeting virtual assistant use cases.
This data has a maximum_duration of 20s.
ML training flow
This document describes the flow of training the base model on LibriSpeech.
This configuration is used as an example as it is quicker to train than large.
Environment Setup
Clone the repo, build the image and set up the container with the appropriate volumes (as described here) with the following commands:
git clone https://github.com/MyrtleSoftware/caiman-asr.git && cd caiman-asr/training
./scripts/docker/build.sh
./scripts/docker/launch.sh <DATASETS> <CHECKPOINTS> <RESULTS>
Data Preparation
From inside the container, run the following command to download LibriSpeech, prepare JSON manifests, create a tokenizer, and a populated yaml configuration file configs/base-8703sp_run.yaml.
./scripts/prepare_librispeech.sh
More details on preparing LibriSpeech into a JSON format can be found here.
Training
Modify <NUM_GPU> based on your machine and then run the following command to train a base model.
A more detailed description of the training process can be found here.
./scripts/train.sh \
  --data_dir /datasets/LibriSpeech \
  --train_manifests librispeech-train-clean-100-flac.json librispeech-train-clean-360-flac.json librispeech-train-other-500-flac.json \
  --val_manifests librispeech-dev-clean-flac.json \
  --model_config configs/base-8703sp_run.yaml \
  --num_gpus 2 \
  --global_batch_size 1024 \
  --grad_accumulation_batches 8 \
  --batch_split_factor 8 \
  --val_batch_size 1 \
  --training_steps 42000
In particular, this command assumes you’re using a 2 x RTX4090 (24GB) system. See here for how to adjust these numbers for your system.
Validation
The following command will run the validation script and calculate the WER [%]. See here for more details.
./scripts/val.sh --model_config configs/base-8703sp_run.yaml
Installation
These steps have been tested on Ubuntu 18.04, 20.04 and 22.04. Other Linux versions may work, since most processing takes place in a Docker container. However, the install_docker.sh script is currently specific to Ubuntu. Your machine does need NVIDIA GPU drivers installed. Your machine does NOT need CUDA installed.
- Clone the repository
git clone https://github.com/MyrtleSoftware/caiman-asr.git && cd caiman-asr
- Install Docker
source training/install_docker.sh
- Add your username to the docker group:
sudo usermod -a -G docker [user]
Run the following in the same terminal window, and you might not have to log out and in again:
newgrp docker
- Build the docker image
# Build from Dockerfile
cd training
./scripts/docker/build.sh
- Start an interactive session in the Docker container mounting the volumes, as described in the next section.
./scripts/docker/launch.sh <DATASETS> <CHECKPOINTS> <RESULTS>
Requirements
Currently, the reference uses CUDA-12.2. Here you can find a table listing compatible drivers: https://docs.nvidia.com/deploy/cuda-compatibility/index.html#binary-compatibility__table-toolkit-driver
Information about volume mounts
Setting up the training environment requires mounting the three directories:
<DATASETS>, <CHECKPOINTS>, and <RESULTS> for the training data, model checkpoints, and results, respectively.
The following table shows the mappings between directories on a host machine and inside the container.
| Host machine | Inside container |
|---|---|
| training | /workspace/training |
<DATASETS> | /datasets |
<CHECKPOINTS> | /checkpoints |
<RESULTS> | /results |
If your <DATASETS> directory contains symlinks to other drives (i.e. if your data is too large to fit on a single drive),
they will not be accessible from within the running container. In this case, you can pass the absolute paths to your drives
as the 4th, 5th, 6th, … arguments to ./scripts/docker/launch.sh.
This will enable the container to follow symlinks to these drives.
During training, the model checkpoints are saved to the /results directory so it is sometimes convenient to
load them from /results rather than from /checkpoints.
Next Steps
Go to the Data preparation docs to see how to download and preprocess data in advance of training.
Model YAML configurations
Before training, you must select the model configuration you wish to train. Please refer to the key features for a description of the options available, as well as the training times. Having selected a configuration it is necessary to note the config path and sentencepiece vocabulary size (“spm size”) of your chosen config from the following table as these will be needed in the subsequent data preparation steps:
| Name | Parameters | spm size | config | Acceleration supported? |
|---|---|---|---|---|
testing | 49M | 1023 | testing-1023sp.yaml | ❌ |
base | 85M | 8703 | base-8703sp.yaml | ✅ |
large | 196M | 17407 | large-17407sp.yaml | ✅ |
It is recommended to train the base model on LibriSpeech as described here before training base or large on your own data.
The base and large architectures were optimized to provide a good tradeoff between WER and throughput on the accelerator.
Other architectures will not run on the accelerator.
train.sh will verify that you are training a model
that is supported by the accelerator.
If you want to skip this check so you can
train the testing model for more rapid iteration,
pass the flag --skip_state_dict_check to train.sh.
Missing YAML fields
The configs referenced above are not intended to be edited directly. Instead, they are used as templates to create <config-name>_run.yaml files. The _run.yaml file is a copy of the chosen config with the following fields populated:
sentpiece_model: /datasets/sentencepieces/SENTENCEPIECE.modelstats_path: /datasets/stats/STATS_SUBDIRmax_duration: MAX_DURATIONngram_path: /datasets/ngrams/NGRAM_SUBDIR
Populating these fields can be performed by the training/scripts/create_config_set_env.sh script.
For example usage, see the following documentation: Prepare LibriSpeech in the JSON format.
Training times
Training times for v1.12.0 on an 8 x A100 (80GB) system are as follows:
| Model | Train-time (days) | Throughput (utt/s) | Throughput (s/s) | No. of updates | grad_accumulation_batches | batch_split_factor |
|---|---|---|---|---|---|---|
base | 0.9 | 1400 | 23,200 | 100k | 1 | 8 |
large | 1.8 | 700 | 11,700 | 100k | 1 | 16 |
Training times for v1.12.0 on a 2 x RTX4090 (24GB) system are as follows:
| Model | Train-time (days) | Throughput (utt/s) | Throughput (s/s) | No. of updates | grad_accumulation_batches | batch_split_factor |
|---|---|---|---|---|---|---|
base | 8.4* | 150 | 2,500 | 100k | 8 | 8 |
large | 28* | 45 | 750 | 100k | 16 | 8 |
Training
where:
- Throughput (s/s) is the number of seconds of audio trained on per second (higher is better).
- Throughput (utt/s) is the number of samples/utterances seen per second during training (higher is better). NOTE: This metric is deprecated and will be removed in a future update, it is provided here for comparison.
- No. of updates is the number of optimiser steps at
--global_batch_size=1024that are required to train the models on the 13k hrs training dataset. You may need fewer steps when training with less data grad_accumulation_batchesis the number of gradient accumulation steps performed on each GPU before taking an optimizer stepbatch_split_factoris the number of sub-batches that thePER_GPU_BATCH_SIZEis split into before these sub-batches are passed through the joint network and loss.- Times appended with a ‘*’ are estimates from throughput scaling and extrapolation.
For more details on these hyper-parameters, including how to set them, please refer to the batch size arguments documentation. For some information about tuning DALI parameters see the heterogeneous CPU page.
Data preparation
Having chosen which model configuration to train, you will need to complete the following preprocessing steps:
- Prepare your data in one of the supported training formats:
JSONorWebDataset. - Create a sentencepiece model from your training data.
- Record your training data log-mel stats for input feature normalization.
- Populate a YAML configuration file with the missing fields.
- Generate an n-gram language model from your training data.
- Optionally standardize transcripts
Text normalization
The examples assume a character set of size 57:
- 26 lowercase letters,
- 26 uppercase letters,
- space,
- full stop (period),
- comma,
- apostrophe,
- question mark.
Transcripts will be normalized on the fly during training,
as set in the YAML config templates, normalize_transcripts: digit_to_word.
See Changing the character set
for how to configure the character set and normalization.
During validation, the predictions and reference transcripts will be standardized.
See also
Supported Dataset Formats
CAIMAN-ASR supports reading data from four formats:
| Format | Modes | Description | Docs |
|---|---|---|---|
JSON | training + validation | All audio as wav or flac files in a single directory hierarchy with transcripts in json file(s) referencing these audio files. | [link] |
Webdataset | training + validation | Audio <key>.{flac,wav} files stored with associated <key>.txt transcripts in tar file shards. Format described here | [link] |
Directories | validation | Audio (wav or flac) files and the respective text transcripts are in two separate directories. | [link] |
Hugging Face | training (using provided conversion script) + validation | Hugging Face Hub datasets | [link] |
To train on your own proprietary dataset you will need to arrange for it to be in the WebDataset or JSON format.
A worked example of how to do this for the JSON format is provided in json_format.md.
The script hugging_face_to_json.py converts a Hugging Face dataset to the JSON format; see here for more details.
If you have a feature request to support training/validation on a different format, please open a GitHub issue.
JSON format
The JSON format is the default in this repository and if you are training on your own data it is recommended to manipulate it into this format. Note that the data preparation steps are slightly different given the model you have decided to train so please refer to the model configuration page first.
Page contents
Prepare LibriSpeech in JSON format
This page takes LibriSpeech as it is distributed from the https://www.openslr.org website and prepares it into a JSON manifest format.
Quick Start
To run the data preparation steps for LibriSpeech and the base model run the following from the training/ directory:
# Download data to /datasets/LibriSpeech: requires 120GB of disk
./scripts/prepare_librispeech.sh
To run preprocessing for the testing or large configurations, instead run:
SPM_SIZE=1023 CONFIG_NAME=testing-1023sp ./scripts/prepare_librispeech.sh
SPM_SIZE=17407 CONFIG_NAME=large-17407sp ./scripts/prepare_librispeech.sh
If ~/datasets on the host is mounted to /datasets, the downloaded data will be accessible outside the container at ~/datasets/LibriSpeech.
Further detail: prepare_librispeech.sh
The script will:
- Download data
- Create
JSONmanifests for each subset of LibriSpeech - Convert the manifests into end-pointed manifests
- Create a sentencepiece tokenizer from the train-960h subset
- Record log-mel stats for the train-960h subset
- Populate the missing fields of a YAML configuration template
- Generate an n-gram language model with KenLM from the train-960h subset
1. Data download
Having run the script, the following folders should exist inside the container:
/datasets/LibriSpeechtrain-clean-100/train-clean-360/train-other-500/dev-clean/dev-other/test-clean/test-other/
2. JSON manifests
/datasets/LibriSpeech/librispeech-train-clean-100-flac.jsonlibrispeech-train-clean-360-flac.jsonlibrispeech-train-other-500-flac.jsonlibrispeech-train-clean-100-flac.eos.jsonlibrispeech-train-clean-360-flac.eos.jsonlibrispeech-train-other-500-flac.eos.jsonlibrispeech-dev-clean-flac.jsonlibrispeech-dev-other-flac.jsonlibrispeech-test-clean-flac.jsonlibrispeech-test-other-flac.json
3. Sentencepiece tokenizer
/datasets/sentencepieces/librispeech8703.modellibrispeech8703.vocab
4. Log-mel stats
/datasets/stats/STATS_SUBDIR:melmeans.ptmeln.ptmelvars.pt
The STATS_SUBDIR will differ depending on the model since these stats are affected by the feature extraction window size. They are:
testing:/datasets/stats/librispeech-winsz0.02- {
base,large}:/datasets/stats/librispeech-winsz0.025
5. _run.yaml config
In the configs/ directory. Depending on the model you are training you will have one of:
testing:configs/testing-1023sp_run.yamlbase:configs/base-8703sp_run.yamllarge:configs/large-17407sp_run.yaml
_run indicates that this is a complete config, not just a template.
6. N-gram language model
/datasets/ngrams/librispeech8703/transcripts.txtngram.arpangram.binary
To train an n-gram on a different dataset, see n-gram docs.
Prepare Other Datasets
Convert your dataset to the JSON format
Options:
- Adapt the code in
caiman_asr_train/data/make_datasets/librispeech.py. - If your dataset is in Hugging Face format, you can use the script described here
Generate artifacts needed for training
Suppose you have preprocessed CommonVoice, organized like this:
CommonVoice17.0
|-- common_voice_17.0_dev
|-- common_voice_17.0_dev.json
|-- common_voice_17.0_test
|-- common_voice_17.0_test.json
|-- common_voice_17.0_train
|-- common_voice_17.0_train.json
To generate the training artifacts, run the following:
DATASET_NAME_LOWER_CASE=commonvoice
MAX_DURATION_SECS=20.0
SPM_SIZE=8703
CONFIG_NAME=base-8703sp
DATA_DIR=/datasets/CommonVoice17.0
NGRAM_ORDER=4
TRAIN_MANIFESTS=/datasets/CommonVoice17.0/common_voice_17.0_train.json
./scripts/make_json_artifacts.sh $DATASET_NAME_LOWER_CASE $MAX_DURATION_SECS \
    $SPM_SIZE $CONFIG_NAME $DATA_DIR $NGRAM_ORDER $TRAIN_MANIFESTS
where:
DATASET_NAME_LOWER_CASEwill determine the name of the generatedSENTENCEPIECEandSTATS_SUBDIRMAX_DURATION_SECSis number of seconds above which audio clips will be discarded during trainingSPM_SIZEis the size of the sentencepiece model—in this case, the base modelCONFIG_NAMEis the name of the template configuration file to readDATA_DIRis the path to your datasetNGRAM_ORDERis the order of the n-gram language model that can be used during beam searchTRAIN_MANIFESTScan be a space-separated list
It is advised that you use all of your training data transcripts to build the sentencepiece tokenizer but it is ok to use a subset of the data to calculate the mel stats via the --n_utterances_only flag to caiman_asr_train/data/generate_mel_stats.py.
Before running make_json_artifacts.sh on your custom dataset, you may want to create an EOS version as explained here
Selecting transcripts
Each JSON manifest should include a “transcript” field, which contains the transcript of the corresponding audio file. However, the key for the transcript field can be customized, the default is “transcript”.
If multiple transcripts exist for the same audio file, the model can be trained using a specific transcript by specifying it in the use_transcripts field of the YAML configuration:
use_transcripts:
  to_use: ["<transcript_key_1>", "<transcript_key_2>", ...]
  on_missing: "raise_error" # or "skip" or "use_default"
The first transcript key that is found in the JSON manifest will be used.
If no key is found in the JSON manifest, the behaviour will depend on the value of the on_missing field:
- “raise_error”: an error will be raised.
- “skip”: the audio file will be skipped.
- “use_default”: the default transcript will be used, if this does not exist, an error will be raised.
Selecting transcripts is only supported when the JSON format is used.
If your dataset format is different, follow the respective documentation, and use the default “transcript” field.
Standardizing transcripts
Training on multiple datasets can negatively impact performance, as identical words may be transcribed differently across datasets - for example, “colour” (British English) vs “color” (American English). This inconsistency splits the model’s probability distribution across multiple spellings, reducing prediction confidence.
To address this, we standardize the training transcripts using Whisper EnglishTextNormalizer. This process follows the same approach as WER standardization (see WER calculation docs for more details).
There are two methods to do this:
Recommended approach: Pre-standardizing manifests
The recommended approach is to standardize your manifests before training using the standardize_manifest.py script:
python caiman_asr_train/data/text/standardize_manifest.py \
  --manifests input.json \
  --preserve-case \
  --preserve-punctuation
This creates standardized versions of each transcript field as <field-name>-standardized (e.g., transcript-standardized).
You can then use these standardized fields during training by configuring your model’s YAML:
use_transcripts:
  to_use: ["transcript-standardized"]
  on_missing: "raise_error" # or "skip" or "use_default"
This approach offers several advantages:
- Faster training startup (standardization is done only once)
- Ability to standardize multiple transcript fields in the same manifest
Multiple manifests and fields can be standardized at once:
python caiman_asr_train/data/text/standardize_manifest.py \
  --manifests input1.json input2.json \
  --transcript-fields transcript transcript2 transcript3 \
This will standardize the transcript, transcript2, and transcript3 fields in each of input1.json and input2.json,
producing input1_standardized.json and input2_standardized.json with the following fields:
transcripttranscript2transcript3transcript-standardizedtranscript2-standardizedtranscript3-standardized
All arguments:
--manifests [str] ...: Absolute path to dataset manifest (.json) files [required].--transcript-fields [str] ...: Names of transcript fields to standardize [default: “transcript”].--preserve-case: Flag to preserve the original casing of the text [optional].--preserve-punctuation: Flag to preserve the original punctuation of the text [optional].--no-expand-contractions: Flag to disable expansion of contractions (e.g. “don’t” -> “do not”) [optional].--output-dir [str]: Directory to save standardized manifests [default: same directories as input manifests].--output-filenames [str]: Filenames to save standardized manifest [default: same as input manifest plus “_standardized”].--model-config [str]: Path to model config to extract user symbols to preserve e.g.<EOS>[default:configs/testing-1023sp_run.yaml].--num-workers [int]: Number of worker processes to use [default: CPU count].--overwrite: Flag to enable overwrite of existing output files.
If using offline standardization of manifests, please ensure to disable on-the-fly standardization by setting
standardize_text to false in the model config (.yaml) file.
By default, standardization expands all contractions (e.g “don’t” -> “do not”). As a result, if you train a model on standardized transcripts, it will always predict the expanded form e.g. it will output “do not” whether the speaker says “don’t” or “do not”.
If this behaviour is not desired,
you can disable contraction expansion during train-time standardization
by passing the --no-expand-contractions flag to the standardize_manifest.py script.
This will however worsen WERs by ~1-2% relative.
Alternative: On-the-fly standardization
Alternatively, the YAML config includes the entry standardize_text: true|false,
enabling on-the-fly standardization of training transcripts during training.
This process standardizes all transcripts at the start of training,
which leads to longer start-up times, but can be more flexible if you are constantly changing datasets.
Preserving casing and punctuation
By default, standardization lowercases and strips punctuation,
which is the desired behaviour for WER standardization.
However, this is undesirable when training models that predict
punctuation or casing (i.e. when normalize_transcripts is not set to lowercase).
Hence, both approaches support these standardization parameters:
preserve_case: true|false- preserve the original casing of the text during standardization.preserve_punctuation: true|false- retain the original punctuation in the text during standardization.
If normalize_transcripts is set to lowercase, these arguments have no effect,
as the text is already being lowercased before standardization.
Whether you choose pre-standardization or on-the-fly standardization, the process generally improves WER by ensuring consistent text formatting across datasets.
Default settings:
normalize_transcripts: digit_to_word
...
standardize_text: true
preserve_case: true
preserve_punctuation: true
Next steps
Having run the data preparation steps, go to the training docs to start training.
See also
WebDataset format
This page gives instructions to read training and validation data from the WebDataset format as opposed to the default JSON format described in the Data Formats documentation.
In the WebDataset format, <key>.{flac,wav} audio files are stored with associated <key>.txt transcripts in tar file shards. The tar file samples are read sequentially which increases I/O rates compared with random access.
Data Preparation
All commands in this README should be run from the training directory of the repo.
WebDataset building
If you would like to build your own WebDataset you should refer to the following resources:
- Script that converts from WeNet legacy format to WebDataset:
make_shard_list.py - Tutorial on creating WebDataset shards
At tarfile creation time, you must ensure that each audio file is stored sequentially with its associated .txt transcript file.
Text normalization
As discussed in more detail here
it is necessary to normalize your transcripts.
It is recommended to do this on the fly by setting normalize_transcripts: digit_to_word in your config file.
Another option is to perform this step offline when you create the WebDataset shards.
Data preparation: preprocess_webdataset.sh
In order to create the artefacts described in the data preparation intro, run the following inside a running container:
DATA_DIR=/datasets/TarredDataset TRAIN_TAR_FILES="train_*tar.tar" DATASET_NAME_LOWER_CASE=librispeech ./scripts/preprocess_webdataset.sh
This script accepts the following arguments:
DATA_DIR: Directory containing tar files.TRAIN_TAR_FILES: One or more shard file paths or globs.DATASET_NAME_LOWER_CASE: Name of dataset to use for naming sentencepiece model. Defaults tolibrispeech.MAX_DURATION_SECS: The maximum duration in seconds that you want to train on. Defaults to16.7as per LibriSpeech.CONFIG_NAME: Model name to use for the config from this table. Defaults tobase-8703sp.SPM_SIZE: Sentencepiece model size. Must matchCONFIG_NAME. Defaults to8703.NGRAM_ORDER: Order of n-gram language model. Defaults to 4.
Training and validation
To trigger training or validation for data stored in WebDataset format you should pass --read_from_tar to train.sh, val.sh.
You will also need to pass --val_tar_files (and for training, --train_tar_files) as one or more tar shard files/globs in --data_dir. For example if all of your training and tar files are in a flat --data_dir directory you might run:
./scripts/train.sh --read_from_tar --data_dir=/datasets/TarredDataset --train_tar_files train_*.tar --val_tar_files dev_*.tar
where {train,val}_tar_files can be one or more filenames or fileglobs. In this mode, your training and validation tar files must have non-overlapping names. Alternatively, if you have a nested file structure you can set --data_dir=/ and then pass absolute paths/globs to --train_tar_files and --val_tar_files for example like:
./scripts/train.sh --read_from_tar --data_dir=/ --train_tar_files /datasets/TarredDataset/train/** --val_tar_files /datasets/TarredDataset/dev/**
Note that in the second case (when paths are absolute), glob expansions will be performed by your shell rather than the WebDatasetReader class.
You should refer to the Training command documentation for more details on training arguments unrelated to this data format.
For validation you might run:
./scripts/val.sh --read_from_tar --data_dir=/datasets/TarredDataset --val_tar_files dev_*.tar
# or, absolute paths
./scripts/val.sh --read_from_tar --data_dir=/ --val_tar_files /datasets/TarredDataset/dev/**
Training and validation support the use of zip files in addition to tar files.
Ensure that the zip files adhere to the WebDataset format.
Additionally, be sure that the arguments passed to --val_tar_files and --train_tar_files are either all tar files or all zip files,
and not a combination of both formats.
WebDataset Limitations
Our WebDataset support currently has the following limitations:
- It isn’t currently possible to mix and match
JSONandWebDatasetformats for the training and validation data passed to./scripts/train.sh. - It is necessary to have more shards per dataset (including validation data) than
num_gpusso that each GPU can read from a different shard.
Hugging Face Dataset Format
Validating directly on a dataset from the Hugging Face Hub
Validating on a Hugging Face dataset is supported in val.sh and train.sh.
To train on a Hugging Face dataset, you will need to convert it to JSON format,
as described in the next section.
This command will run validation on distil-whisper’s version of LibriSpeech dev-other:
./scripts/val.sh --num_gpus 8 \
  --checkpoint /path/to/checkpoint.pt  \
  --use_hugging_face \
  --hugging_face_val_dataset distil-whisper/librispeech_asr \
  --hugging_face_val_split validation.other
This will download the dataset and cache it in ~/.cache/huggingface, which will persist between containers.
Since datasets are large, you may wish to change the Hugging Face cache location via HF_CACHE=[path] ./scripts/docker/launch.sh ....
For some datasets, you may need to set more options. The following command will validate on the first 10 utterance of google/fleurs:
./scripts/val.sh --num_gpus 8 \
  --checkpoint /path/to/checkpoint.pt \
  --use_hugging_face \
  --hugging_face_val_dataset google/fleurs \
  --hugging_face_val_config en_us \
  --hugging_face_val_transcript_key raw_transcription \
  --hugging_face_val_split validation[0:10]
See the docstrings for more information.
Converting a Hugging Face dataset to JSON format
The following command will download the train.clean.100 split of
distil-whisper/librispeech_asr
and convert it to JSON format,
putting the result in /datasets/LibriSpeechHuggingFace:
python caiman_asr_train/data/make_datasets/hugging_face_to_json.py \
  --hugging_face_dataset distil-whisper/librispeech_asr \
  --data_dir /datasets/LibriSpeechHuggingFace \
  --hugging_face_split train.clean.100
Directory of audio format
It is possible to run validation on all audio files (and their respective .txt transcripts)
found recursively in two directories --val_audio_dir and --val_txt_dir.
Directory Structure
The audio and transcripts directories should contain the same number of files, and the file names should match. For example, the structure of the directories could be:
audio_dir/
  dir1/
    file1.wav
    file2.wav
txt_dir/
  dir1/
    file1.txt
    file2.txt
The audio and transcript files can be under the same directory.
Running Validation
Using data from directories for validation can be done by parsing the argument
--val_from_dir along with the audio and transcript directories as follows:
scripts/val.sh --val_from_dir --val_audio_dir audio_dir --val_txt_dir txt_dir --dataset_dir /path/to/dataset/dir
where the audio_dir and txt_dir are relative to the --dataset_dir.
When training on webdataset files (--read_from_tar=True in the train.py), validation on directories is not supported.
Log-mel feature normalization
We normalize the acoustic log mel features based on the global mean and variance recorded over the training dataset.
Record dataset stats
The script generate_mel_stats.py computes these statistics
and stores them in /datasets/stats/<dataset_name+window_size> as PyTorch tensors. For example usage see:
scripts/make_json_artifacts.shscripts/preprocess_webdataset.sh
Training stability
Empirically, it was found that normalizing the input activations with dataset global mean and variance makes the early stage of training unstable.
As such, the default behaviour is to move between two modes of normalization on a schedule during training. This is handled by the MelFeatNormalizer class and explained in the docstring below:
class MelFeatNormalizer:
    """
    Perform audio normalization, optionally blending between two normalization types.

    The two types of normalization are:
        1. use pre-computed NormType.DATASET_STATS per mel bin and normalize each
        timestep independently
        2. use utterance-specific NormType.UTTERANCE_STATS per mel bin that are
        calculated over the time-dimension of the mel spectrogram

    The first of these is used for validation/inference. The second method isn't
    streaming compatible but is more stable during the early stages of training.
    Therefore, by default, the training script blends between the two methods on a
    schedule.
Validation
When running validation, the dataset global mean and variance are always used for normalization regardless of how far through the schedule the model is.
Backwards compatibility
Prior to v1.9.0, the per-utterance stats were used for normalization during training (and then streaming normalization was used during inference).
To evaluate a model trained on <=v1.8.0, use the --norm_over_utterance flag to the val.sh script.
Training
Training Command
Quick Start
This example demonstrates how to train a model on the LibriSpeech dataset using the base model configuration.
This guide assumes that the user has followed the installation guide
and has prepared LibriSpeech according to the data preparation guide.
Selecting the batch size arguments is based on the machine specifications. More information on choosing them can be found here.
Recommendations for LibriSpeech training are:
- a global batch size of 1024 for a 24GB GPU
- use all
train-*subsets and validate ondev-clean - 42000 steps is sufficient for 960hrs of train data
- adjust number of GPUs using the
--num_gpus=<NUM_GPU>argument
To launch training inside the container, using a single GPU, run the following command:
./scripts/train.sh \
  --data_dir=/datasets/LibriSpeech \
  --train_manifests librispeech-train-clean-100-flac.json librispeech-train-clean-360-flac.json librispeech-train-other-500-flac.json \
  --val_manifests librispeech-dev-clean-flac.json \
  --model_config configs/base-8703sp_run.yaml \
  --num_gpus 1 \
  --global_batch_size 1024 \
  --grad_accumulation_batches 16 \
  --batch_split_factor 8 \
  --val_batch_size 1 \
  --training_steps 42000
The output of the training command is logged to /results/training_log_[timestamp].txt.
The arguments are logged to /results/training_args_[timestamp].json,
and the config file is saved to /results/[config file name]_[timestamp].yaml.
Defaults to update for your own data
When training on your own data you will need to change the following args from their defaults to reflect your setup:
--data_dir--train_manifests/--train_tar_files- To specify multiple training manifests, use
--train_manifestsfollowed by space-delimited file names, like this:--train_manifests first.json second.json third.json.
- To specify multiple training manifests, use
--val_manifests/--val_tar_files/(--val_audio_dir+--val_txt_dir)--model_config=configs/base-8703sp_run.yaml(or the_run.yamlconfig file created by yourscripts/preprocess_<your dataset>.shscript)
The audio paths stored in manifests are relative with respect to --data_dir. For example,
if your audio file path is train/1.flac and the data_dir is /datasets/LibriSpeech, then the dataloader
will try to load audio from /datasets/LibriSpeech/train/1.flac.
The learning-rate scheduler argument defaults are tested on 1k-50k hrs of data but when training on larger datasets than this you may need to tune the values. These arguments are:
--warmup_steps: number of steps over which learning rate is linearly increased from--min_learning_rate--hold_steps: number of steps over which the learning rate is kept constant after warmup--half_life_steps: the half life (in steps) for exponential learning rate decay
If you are using more than 50k hrs, it is recommended to start with half_life_steps=10880 and increase if necessary. Note that increasing
--half_life_steps increases the probability of diverging later in training.
Arguments
To resume training or fine tune a checkpoint see the documentation here.
The default setup saves an overwriting checkpoint every time the Word Error Rate (WER) improves on the dev set.
Also, a non-overwriting checkpoint is saved at the end of training.
By default, checkpoints are saved every 5000 steps, and the frequency can be changed by setting --save_frequency=N.
For a complete set of arguments and their respective docstrings see
args/train.py
and
args/shared.py.
Controlling the proportion of data from each manifest
If you would like to adapt the proportion of data that the model sees from each manifest per batch you can use the --train_manifest_ratios flag. For example:
./scripts/train.sh \
  --train_manifests high_quality.json low_quality.json \
  --train_manifest_ratios 1 1 \
would have 50% of utterances from high_quality.json and 50% from low_quality.json in each batch. This is useful if, for example, low_quality.json is much larger than high_quality.json and more efficient than truncating low_quality.json as the model would then not see all the data as it will with the --train_manifest_ratios flag.
Alternatively, if you want to upweight high_quality.json by a factor of 2,
you can use
./scripts/train.sh \
  --train_manifests high_quality.json low_quality.json \
  --relative_train_manifest_ratios 2 1 \
This is not the same as the --train_manifest_ratios flag,
since --relative_train_manifest_ratios also takes the original length of the manifest into account.
When manifest balancing is on we use the word epoch to mean: the minimum time until any sample is seen again. This parallels the definition used when manifest balancing is off but relaxes the condition that all the data must be seen.
Canary-manifest balancing
Setting the train manifest ratios can be a laborious task that requires much experimentation, a sensible default can be obtained from the canary paper:
$$ p_s \sim \left( \frac{n_s}{N} \right)^\alpha $$
With, \(p_s\) the prob of sampling from the \(x\) manifest, \(n_s\) the number of hours in the corresponding manifest and \(x\) the total number of hours:
$$ N = \sum_s n_s $$
We do manifest balancing in utterance space instead of time space, these are related by a manifest dependent constant:
$$ n_s \approx k_s u_s $$
With \(u_s\) the number of utterances in the \(x\) manifest. Hence if we want the number of hours of each epoch to match the canary proportions we need:
$$ \begin{align} r_s = \frac{p_s}{k_s} = \frac{u_s}{n_s} \left( \frac{n_s}{\sum_i n_i} \right)^\alpha \end{align} $$
Where \(r_s\) is the manifest ratio needed by --train_manifest_ratios. This
is all computed automatically when the --canary_exponent <alpha-value> flag
is passed at the CLI.
Note: Canary manifest balancing is on by default with an exponent of 0.75
unless --canary_exponent is set to a negative value to disable it, or any of
--train_manifest_ratios and --relative_train_manifest_ratios are passed.
Dataset YAML Configuration
Instead of specifying --train_manifests and --relative_train_manifest_ratios directly,
you can use a YAML file to define the dataset list and corresponding relative weights.
This method simplifies configuration and ensures clarity when using multiple datasets.
- The YAML file specifies manifest files and their relative weights.
- It does not use absolute ratios (–train_manifest_ratios), only relative ratios (–relative_train_manifest_ratios).
- If no weight is provided, it defaults to 1.0 - not Canary weighting.
- It only works with manifest files, not tar files.
An example YAML configuration for LibriSpeech can be found at training/configs/librispeech.yaml.
To use a YAML file, pass it with --train_dataset_yaml, e.g.
./scripts/train.sh \
  --data_dir=/datasets/LibriSpeech \
  --train_dataset_yaml configs/librispeech.yaml \
  --val_manifests librispeech-dev-clean-flac.json \
  --model_config configs/base-8703sp_run.yaml \
  --num_gpus 1 \
  --global_batch_size 1024 \
  --training_steps 42000
--train_dataset_yaml cannot be used together with --train_manifests, --train_manifest_ratios, --relative_train_manifest_ratios, or --canary_exponent.
If any of these options are provided alongside --train_dataset_yaml, an error will be raised.
Data Augmentation for Difficult Target Data
If you are targeting a production setting where background noise is common or audio arrives at 8kHZ, see here for guidelines.
Monitor training
To view the progress of your training you can use TensorBoard. See the TensorBoard documentation for more information of how to set up and use TensorBoard.
Profiling
To profile training, see these instructions.
Controlling emission latency
See these instructions on how to control emission latency of a model.
Next Steps
Having trained a model:
- If you’d like to evaluate it on more test/validation data go to the validation docs.
- If you’d like to export a model checkpoint for inference go to the hardware export docs.
See also
Batch size hyperparameters
If you are training on an 8 x A100 (80GB) or 8 x A5000 (24GB) machine, the recommended batch size hyper-parameters are given here. Otherwise, this page gives guidance on how to select them. For a training command on num_gpus there are three command line args:
global_batch_sizegrad_accumulation_batchesbatch_split_factor
The Summary section at the bottom of this page describes how to select them. Before that, hyper-parameters and the motivation behind their selection are provided.
global_batch_size
This is the batch size seen by the model before taking an optimizer step.
RNN-T models require large global_batch_sizes in order to reach good WERs, but the larger the value, the longer training takes. The recommended value is --global_batch_size=1024 and many of the defaults in the repository (e.g. learning rate schedule) assume this value.
grad_accumulation_batches
This is the number of gradient accumulation steps performed on each GPU before taking an optimizer step. The actual PER_GPU_BATCH_SIZE is not controlled directly but can be calculated using the formula:
PER_GPU_BATCH_SIZE * grad_accumulation_batches * num_gpus = global_batch_size
The highest training throughput is achieved by using the highest PER_GPU_BATCH_SIZE (and lowest grad_accumulation_batches) possible without incurring an out-of-memory error (OOM) error.
Reducing grad_accumulation_batches will increase the training throughput but shouldn’t have any affect on the WER.
batch_split_factor
The joint network output is a 4-dimensional tensor that requires a large amount of GPU VRAM. For the models in this repo, the maximum PER_GPU_JOINT_BATCH_SIZE is much lower than the maximum PER_GPU_BATCH_SIZE that can be run through the encoder and prediction networks without incurring an OOM. When PER_GPU_JOINT_BATCH_SIZE=PER_GPU_BATCH_SIZE, the GPU will be underutilised during the encoder and prediction forward and backwards passes which is important because these networks constitute the majority of the training-time compute.
The batch_split_factor arg makes it possible to increase the PER_GPU_BATCH_SIZE whilst keeping the PER_GPU_JOINT_BATCH_SIZE constant where:
PER_GPU_BATCH_SIZE / batch_split_factor = PER_GPU_JOINT_BATCH_SIZE
Starting from the default --batch_split_factor=1 it is usually possible to achieve higher throughputs by reducinggrad_accumulation_batches and increasing batch_split_factor while keeping their product constant.
Like with grad_accumulation_batches, changing batch_split_factor should not impact the WER.
Summary
In your training command it is recommended to:
- Set
--global_batch_size=1024 - Find the smallest possible
grad_accumulation_batchesthat will run without an OOM in the joint network or loss calculation - Then, progressively decrease
grad_accumulation_batchesand increasebatch_split_factorkeeping their product constant until you see an OOM in the encoder. Use the highestbatch_split_factorthat runs.
In order to test these, it is recommended to use your full training dataset as the utterance length distribution is important.
To check this quickly set --n_utterances_only=10000 in order to sample 10k utterances randomly from your data,
and --training_steps=20 in order to run 2 epochs (at the default --global_batch_size=1024).
When comparing throughputs it is better to compare the avg train utts/s from the second epoch as the first few iterations of the first epoch can be slow.
Special case: OOM in step 3
There is some constant VRAM overhead attached to batch splitting so for some machines, when you try step 3. above you will see OOMs. In this case you should:
- Take the
grad_accumulation_batchesfrom step 2. and increase by *=2 - Then perform step 3.
In this case it’s not a given that your highest throughput setup with batch_split_factor > 1 will be higher than the throughput from step 2. with --batch_size-factor=1 so you should use whichever settings give a higher throughput.
Training on heterogeneous CPUs
Modern desktop computers may have heterogeneous CPUs i.e. performance and efficiency cores. If you launch DALI with the default number of cores this can slow down your train as the DALI pipeline will be bottle-necked by the much slower efficiency cores. This effect can be quite pronounced. For example, on an 13th Gen Intel(R) Core(TM) i7-13700K training with 24 DALI threads trains at 350 UTT/s but training on 8 cores runs close to 500 UTT/s! To determine the correct number of cores run lstopo --of console. Then set --dali_processes_per_cpu= as appropriate (you may need to apt install hwloc).
TensorBoard
The training scripts write TensorBoard logs to /results during training.
To monitor training using TensorBoard, launch the port-forwarding TensorBoard container in another terminal:
./scripts/docker/launch_tb.sh <RESULTS> <OPTIONAL PORT NUMBER> <OPTIONAL NUM_SAMPLES>
If <OPTIONAL PORT NUMBER> isn’t passed then it defaults to port 6010.
NUM_SAMPLES is the number of steps that TensorBoard will sample from the log and plot.
It defaults to 1000.
Then navigate to http://traininghostname:<OPTIONAL PORT NUMBER> in a web browser.
If a connection dies and you can’t reconnect to your port because it’s already allocated, run:
docker ps
docker stop <name of docker container with port forwarding>
Challenging target data
This page describes data augmentations that may help with these problems:
- Problem: Your target audio has non-speech background noise
- Solution: Train with background noise
- Problem: Speakers in your target audio talk over each other
- Solution: Train with babble noise
- Problem: Your target audio was recorded at 8 kHz, e.g. a narrowband telephone connection
- Solution: Train with narrowband conversion
- Problem: Your target audio is recorded on a poor-quality microphone
- Solution: Train with microphone augmentations
- Problem: Your target audio is in a different room environment to your training data
- Solution: Train with room augmentations
Page contents
- Background Noise for training with background noise
- Babble Noise for training with babble noise
- Narrowband for training with narrowband conversion
- Microphone and Room Augmentations
- Inspecting Augmentations to listen to the effects of augmentations
- Random State Passing for training on long sequences
- Tokens Sampling for training with random tokens sampling
- Label Smoothing for training with label smoothing
- Gradient Noise for training with gradient noise
Example Command
The following command will train the base model on the LibriSpeech dataset on an 8 x A100 (80GB) system with these settings:
- applying background noise to 25% of samples
- applying babble noise to 10% of samples
- downsampling 50% of samples to 8 kHz
- using the default noise schedule
- initial values 30–60dB
- noise delay of 4896 steps
- noise ramp of 4896 steps
./scripts/train.sh --model_config=configs/base-8703sp_run.yaml --num_gpus=8 \
    --grad_accumulation_batches=1 --batch_split_factor=8 \
    --training_steps=42000 --prob_background_noise=0.25 \
    --prob_babble_noise=0.1 --prob_train_narrowband=0.5 \
    --val_manifests=/datasets/LibriSpeech/librispeech-dev-other-flac.json
These augmentations are applied independently, so some samples will have all augmentation types applied.
Background noise training
Background noise is set via the --prob_background_noise argument.
By default, prob_background_noise is 0.25.
Background noise takes a non-speech noise file and mixes it with the speech.
On an 8 x A100 (80GB) system, turning off background noise augmentation increases the base model’s training throughput by ~17% and the large model’s throughput by ~11%.
Implementation
The noise data is combined with speech data on-the-fly during training, using a
signal to noise ratio (SNR) randomly chosen between internal variables low and high.
The initial values for low and high can be specified (in dB) using the --noise_initial_low and
--noise_initial_high arguments when calling train.sh. This range is then maintained for the number of
steps specified by the --noise_delay_steps argument after which the noise level is ramped up over
--noise_ramp_steps to its final range.
The final range for background noise is 0–30dB (taken from the Google paper “Streaming
end-to-end speech recognition for mobile devices”, He et al., 2018).
Before combination, the noise audio will be duplicated to become at least as long as the speech utterance.
Background noise dataset
By default, background noise will use Myrtle/CAIMAN-ASR-BackgroundNoise from the Hugging Face Hub.
Note that this dataset will be cached in ~/.cache/huggingface/ in order to persist between containers.
You can change this location like so: HF_CACHE=[path] ./scripts/docker/launch.sh ....
To change the default noise dataset, set --noise_dataset to an audio dataset on the Hugging Face Hub.
The training script will use all the audios in the noise dataset’s train split.
If you instead wish to train with local noise files, make sure your noise is organized in the Hugging Face AudioFolder format.
Then set --noise_dataset to be the path to the directory containing your noise data (i.e. the parent of the data directory), and pass --use_noise_audio_folder.
Babble noise training
Babble noise is set via the --prob_babble_noise argument.
By default, prob_babble_noise is 0.0.
Babble is applied by taking other utterances from the same batch and mixing them with the speech.
Implementation
Babble noise is combined with speech in the same way that background noise is.
The --noise_initial_low, --noise_initial_high, --noise_delay_steps, and --noise_ramp_steps
arguments are shared between background noise and babble noise.
The only difference is that the final range of babble noise is 15–30dB.
Narrowband training
For some target domains, data is recorded at (or compressed to) 8 kHz (narrowband). For models trained with audio >8 kHz (16 kHz is the default) the audio will be upsampled to the higher sample rate before inference. This creates a mismatch between training and inference, since the model will partly rely on information from the higher frequency bands.
This can be partly mitigated by resampling a part of the training data to narrowband and back to higher frequencies, so the model is trained on audio that more closely resembles the validation data.
To apply this downsampling on-the-fly to a random half of batches, set --prob_train_narrowband=0.5 in your training command.
Microphone and Room augmentations
Microphone and room augmentations are enabled by supplying non-zero values for:
--prob_microphone_aug <value>
--prob_room_aug <value>
We recommend setting both to 0.2 for a fine tuning pass.
These augmentations work by convolving an impulse response function which describes the frequency/time responses of the microphone/room with the audio signal.
Implementation
The augmentations are applied on the fly by mixing the utterances with impulse responses. The impulse responses are loaded from:
--microphone_dataset <path_to_directory>
--room_dataset <path_to_directory>
We recommend using the room impulse response collection introduced by “A Study on Data Augmentation of Reverberant Speech for Robust Speech Recognition”
For microphone augmentations, we recommend using the impulse responses from the “Microphone impulse response project”
Inspecting augmentations
To listen to the effects of augmentations, pass --inspect_audio. All audios will then be saved to /results/augmented_audios after augmentations have been applied. This is intended for debugging only—DALI is slower with this option, and a full epoch of saved audios will use as much disk space as the training dataset.
Random State Passing
RNN-Ts can find it difficult to generalise to sequences longer than those seen during training, as described in Chiu et al, 2020.
Random State Passing (RSP) (Narayanan et al., 2019) reduces this issue by simulating longer sequences during training. It does this by initialising the model with states from the previous batch with some probability. On in-house validation data, this reduces WERs on long (~1 hour) utterances by roughly 40% relative.
Further details
Experiments indicated:
- It was better to apply RSP 1% of the time, instead of 50% as in the paper.
- Applying RSP from the beginning of training raised WERs, so RSP is only applied after
--rsp_delaysteps--rsp_delaycan be set on the command line but, by default, is set to the step at which the learning rate has decayed to 1/8 of its initial value (i.e. after x3half_life_stepshave elapsed). To see the benefits from RSP, it is recommended that >=5k updates are done after the RSP is switched on, so this heuristic will not be appropriate if you intend to cancel training much sooner than this. See docstring ofset_rsp_delay_defaultfunction for more details.
RSP is on by default, and can be modified via the --rsp_seq_len_freq argument, e.g. --rsp_seq_len_freq 99 0 1.
This parameter controls RSP’s frequency and amount; see the --rsp_seq_len_freq docstring in args/train.py.
RSP requires Myrtle.ai’s custom LSTM which is why custom_lstm: true is set by default in the yaml configs.
See also
RSP is applied at training-time. An inference-time feature, state resets can be used in conjunction with RSP to further reduce WERs on long utterances.
Tokens Sampling
Text needs to be in the form of tokens before it is processed by the RNNT. These tokens can represent words, characters, or subwords. CAIMAN-ASR uses subwords which are formed out of 28 characters, namely the lower-case english alphabet letters, along with the space and apostrophe characters. The tokens are derived from the tokenizer model SentencePiece. A SentencePiece tokenizer model can be trained on raw text, and produces a vocabulary with the most probable subwords that emerge in the text. These derived vocabulary entries (i.e. the tokens) are scored according to the (negative log) probability of occurring in the text that the tokenizer was trained on. The tokenizer entries include all the individual characters of the text, in order to avoid out-of-vocabulary error when tokenizing any text. When using the tokenizer model to convert text into tokens the user has the option of tokenizing not with the most probable tokens (subwords), but with a combination of tokens that have lower score.
Utilising the random tokens sampling is a form of data augmentation and it is applied on a percentage of the training data, and not on the validation data. This can be done with setting the sampling parameter into a real value in the range [0.0, 1.0] in the configuration file, e.g.:
sampling: 0.05
A value of 0.05 (default) means that 5% of the training data will be tokenized with random tokens sampling. A value of 0.0 means no use of tokens sampling, whereas a value of 1.0 applies random tokens sampling in the whole text.
Label smoothing
Label smoothing is the process of softening target labels in a classification problem. Normally this is achieved by transforming a delta-function target to a delta-function plus uniform distribution. However, the extension of this to RNNT is not straightforward if non-local smoothing is desired. Myrtle uses a doubly-stochastic approach: alternative labels are synthesized on the fly and used a small percentage of the time. This smooths the averaged target over multiple optimizer steps. The labels are generated by replacing words in the ground-truth label with “close” words (as determined by the Levenshtein distance).
Label smoothing is on by default, it is controlled by the label_smoothing_kwargs
sub-key of the tokenizer configuration in the config file:
label_smoothing_kwargs:
  dict_path: "<path/to/words.txt>"
  levenshtein_threshold: <float>
  prob_smooth_word: <float>
Where dict_path is the path to the dictionary file, this should be formatted
the same as a standard unix dictionary file (see /usr/share/dict/words or
/usr/dict/words). levenshtein_threshold * len(word) is the maximum Levenshtein distance
for words to be considered “close”. prob_smooth_word is the probability of a word
being replaced by a “close” word (the “close” words are sampled uniformly).
Recommended values are levenshtein_threshold=0.34 and prob_smooth_word=0.01.
Gradient Noise
Adding Gaussian noise to the network gradients improves generalization to out-of-domain datasets by not over-fitting on the datasets it is trained on. Inspired by the research paper by Neelakantan et. al., the noise level is sampled from a Gaussian distribution with \(mean=0.0\) and standard deviation that decays according to the following formula:
$$ \sigma(t)=\frac{noise}{{(1 + t - t_{start})}^{decay}}, $$
\(noise\) is the initial noise level, \(decay=0.55\) is the decay constant, \(t\) is the step, and \(t_{start}\) is the step when the gradient noise is switched on.
Training with gradient noise is switched off by default. It can be switched on by setting the noise level to be a positive value in the config file.
Experiments indicate that the best time to switch on the gradient noise is after the warm-up period
(i.e. after warmup_steps). Moreover, the noise is only added in the gradients of the encoder components,
hence if during training the user chooses to freeze the encoder, adding gradient noise will be off by default.
Resuming and Fine-tuning
The --resume option to the train.sh script enables you to resume training from a --checkpoint=/path/to/checkpoint.pt
file including the optimizer state.
Resuming from a checkpoint will continue training from the last step recorded in the checkpoint, and the files that will be seen by
the model will be the ones that would be seen if the model training was not interrupted.
In the case of resuming training when using tar files, the order of the files that will be seen by the model is the same as the order that the model saw when
the training started from scratch, i.e. not the same as if training had not been interrupted.
The --fine_tune option ensures that training starts anew, with a new learning rate schedule and optimizer state from the specified checkpoint.
To freeze the encoder weights during training change the enc_freeze option in the config file to:
enc_freeze: true
Profiling
You can turn on profiling by passing --profiler in your training or validation command. Note that profiling will likely slow down the script and is intended as a debugging feature.
Some of the profiling results are only saved after the script completes so it is necessary to avoid killing with Ctrl + C if you want to record the full profiling results.
As such, when profiling training it is recommended to:
- profile a small number of
--training_steps - set
--n_utterances_only [N_UTTERANCES_ONLY]to sample from the training dataset.
Similarly, when profiling validation it is recommended to use --nth_batch_only=<batch idx>
Profiling results will be saved in [output_dir]/benchmark/. This consists of:
-
yappi logs named
program[rank]_[timestamp].prof. These can be viewed via SnakeViz:Launch a container with the command
SNAKEVIZ_PORT=[an unused port] ./scripts/docker/launch.sh .... Inside the container, run./scripts/profile/launch_snakeviz.bash /results/benchmark/program[rank]_[timestamp].profThis will print an interactive URL that you can view in a web browser.
-
top logs named
top_log_[timestamp].html. These can be viewed outside the container using a web browser. -
nvidia-smi text logs named
nvidia_smi_log_[timestamp].txt. -
Manual timings of certain parts of the training loop for each training step constituting an epoch. These are text files named
timings_stepN_rankM_[timestamp].txt. -
system information in
system_info_[timestamp].txt.
Sending results
In order to share debug information with Myrtle.ai please run the following script:
OUTPUT_DIR=/<results dir to share> TAR_FILE=logs_to_share.tar.gz ./scripts/tar_logs_exclude_ckpts.bash
This will compress the logs excluding any checkpoints present in OUTPUT_DIR. The resulting logs_to_share.tar.gz file can be shared with Myrtle.ai or another third-party.
Changing the character set
With default training settings, the CAIMAN-ASR model will output punctuated (space, full stop, comma, apostrophe, question mark) and cased English ASCII characters.
This page describes how to change the settings to support additional characters or different languages.
The code has been tested with English language training, but it provides basic support for other languages. If you would like additional support for a specific language, please contact caiman-asr@myrtle.ai
Guidelines
Step 1: Choose a character set
As described above, the default character set is:
- 26 lowercase English letters,
- 26 uppercase English letters,
- space,
- full stop (period),
- comma,
- apostrophe,
- question mark.
The maximum size of your character set is the sentencepiece vocabulary size, as each character in the character set receives a unique token in the sentencepiece vocabulary. See here for the vocabulary size for each model configuration.
We recommend keeping the character set at least an order of magnitude smaller than the sentencepiece vocabulary size. Otherwise there may be too few multi-character subwords in the vocabulary, which might make the model less effective.
Step 2: Choose a normalizer
It’s possible for the raw training data to contain characters other than those in the character set. For instance, an English dataset might contain “café”, even if the character set is only ASCII.
To handle these rare characters, you can select a normalizer in the yaml config file. The options, in order of least to most interference, are:
identity- Does not transform the input text
scrub- Removes characters that are not in the config file’s character set
- Recommended for languages that use a character set different than ASCII
ascii- Replaces non-ASCII characters with ASCII equivalents
- For example, “café” becomes “cafe”
- Recommended if model is predicting English with digits
- Also applies
scrub
digit_to_word(default)- Replaces digits with their word equivalents
- For example, “123rd” becomes “one hundred and twenty-third”
- Assumes English names for numbers
- Recommended for predicting punctuated and cased English without digits.
- Also applies
asciiandscrub
lowercase- Lowercases text and expands abbreviations
- For example, “Mr.” becomes “mister”
- Recommended for predicting lowercase English without digits
- Also applies
digit_to_word,ascii, andscrub
Step 3: Custom replacements
You may want to tweak how text is normalized, beyond the five normalizers listed above. For example, you might want to make the following changes to your training transcripts:
- Replace “;” with “,”
- Replace “-” with “ “ if normalization is on and “-” isn’t in your character set, so that “twenty-one” becomes “twenty one” instead of “twentyone”
You can make these changes by adding custom replacement instructions to the yaml file. Example:
    replacements:
      - old: ";"
        new: ","
      - old: "-"
        new: " "
In the normalization pipeline, these replacements will be applied
just before the transcripts are scrubbed of characters not in the character set.
The replacements will still be applied even if the normalizer is identity,
although by default there are no replacements.
Step 4: Tag removal
Some datasets contain tags, such as <silence> or <affirmative>.
By default, these tags are removed from the training transcripts
during on-the-fly text normalization, before the text is tokenized.
Hence the model will not predict these tags during inference.
If you want the model to be trained with tags
and possibly predict tags during inference,
set remove_tags: false in the yaml file.
If you set remove_tags: false
but do not train your tokenizer on a dataset with tags,
the tokenizer will crash
if it sees tags during model training or validation.
Step 5: Update fields in the model configuration
You’ll want to update:
- the character set under
labelsto your custom character set - the normalizer under
normalize_transcripts - the replacements under
replacements - Whether to remove tags, under
remove_tags
Step 6: Train a sentencepiece model
The following command is used to train the Librispeech sentencepiece model using the default character set, as happens here:
python caiman_asr_train/data/spm/spm_from_json.py --spm_size "$SPM_SIZE" \
	--spm_name "$SPM_NAME" --data_dir "$DATA_DIR" \
	--train_manifests $TRAIN_MANIFESTS \
	--output_dir /datasets/sentencepieces \
	--model_config "$RUN_CONFIG" \
	--input_sentence_size 5000000
This script reads the config file, so it will train the correct sentencepiece model for your character set, normalizer, and replacements.
You may also wish to run some other scripts in
scripts/make_json_artifacts.sh,
such as the scripts that prepare the LM data
and train the n-gram LM using your new tokenizer.
Step 7: Finish filling out the model configuration
If you haven’t filled out the standard
missing fields
in the yaml config file, be sure to update them,
especially the sentpiece_model you trained in Step 6.
Step 8: Large character sets
If you are training on a language like Chinese that has a large character set, be sure to train a sentencepiece model with at least as many tokens as there are unique characters.
You may also want to use character error rate
The sentencepiece model will not include characters in its vocabulary if they are exceptionally rare in the training data. This is not an issue when training on English, since no character is very rare. But for other languages, this can cause training to crash during the token cache generation.
To prevent this, you can change the error to a warning:
- If your sentencepiece model is
/path/to/sentencepiece.model, create a file called/path/to/sentencepiece.yaml. This is a configuration file that controls global settings for the sentencepiece model. - Add the following line:
(The default isunk_handling: WARNFAIL.) - If you still see many (>100) warnings about unknown tokens during training, there likely is a true problem with your sentencepiece model. Please contact caiman-asr@myrtle.ai so Myrtle can add support for your language.
Inspecting character errors
By default, the WER calculation
ignores capitalization or punctuation errors.
If you would like to see an analysis of these errors,
you can use the flag --breakdown_wer.
Delay Penalty
Delay penalty is an algorithm that was introduced in this paper to reduce emission latency of RNN-T models. The idea is to penalize delayed emission of non-blank tokens according to the specific frame indexes during training. The algorithm was implemented directly into the Apex loss calculation by introducing an auxiliary term to the vanilla RNN-T loss. The implementation supports two options of setting the delay penalty: a constant value or a stepwise scheduler.
It is important to note that reducing emission latency may result in a slight degradation of WER. In general, the higher the delay penalty, the lower the emission latency and the higher the WER.
Constant delay penalty
The original paper describes fixing the delay penalty at a constant value lambda throughout the training. This setup can be used by passing the following argument to the training script:
./scripts/train.sh --delay_penalty=lambda
The paper shows that the optimal values of lambda are in range of [0.001, 0.01].
Stepwise
Our experiments have shown that a non-constant delay penalty scheduler achieves a better trade-off between WER and emission latency. Enabling delay penalty before the model has learned a small amount of language was empirically found to prevent the RNN model from converging below a WER of 100%. However, this requires having a good estimate before training of the point at which the model goes below 100% WER. The stepwise schedule avoids this by stepping from an initial delay penalty to a final delay penalty at a WER threshold. The stepwise schedule can be enabled by passing:
--delay_penalty 'wer_schedule' \
--dp_initial_value <value before toggle step> \
--dp_final_value <value after toggle step> \
--dp_toggle_step <fallback training step to toggle on> \
--dp_wer_threshold <WER threshold to trigger step>
The default values for these arguments were the values used to train the v1.13.0 models.
Next steps
To evaluate the emission latency of your model, see the Emission Latency documentation.
Endpointing
End-pointing (EP) is a feature that allows a model to predict when a speaker has arrived at the end of a sentence/utterance. Endpointing works by augmenting the token-set with a special control token - <EOS>. When model is trained on ‘segmented’ transcripts, separated with the <EOS> token, it learns to predict the token.
Training an EP model
Add an EOS token definition to your model config, we suggest using <EOS>, see the examples in the config folder.
Generating segmented transcripts
To convert a regular dataset to a segmented dataset use the eos_add.py script:
python scripts/eos_add.py \
    --data_dir=/datasets/Unsegmented \
    --output_dir=/datasets/Segmented \
    --manifests man1.json man2.json etc.json
This will use the wtpsplit model family to add EOS tokens to your training manifest. This may take several hours depending on the size of your dataset and hardware.
Tokenizer with EOS support
Generate a new tokenizer from your segmented transcripts following the documentation
N-gram language model
Generate a new N-gram model with your segmented transcripts and EOS-enabled tokenizer following the documentation
Controlling endpointing during decoding
Endpointing is enabled when an EOS token is specified in the config file. If endpointing is enabled the decoding of the EOS token has special handling and the --eos_decoding strategy must be specified. The options available are:
ignore- The model’s output probabilities are adjusted such that the probability of predicting the EOS token is zero i.e.p(EOS) <- 0.blank- The probability of predicting the EOS token is moved to the blank token, i.e.prob_blank = prob_EOS + prob_blankandprob_EOS = 0none- This is for compatibility with checkpoints whose tokenizers do not have an EOS token.predict- EOS prediction is on. The model predicts the EOS token as it would for any other token. Predict mode allows for controlling the posterior of the EOS token to account for the disproportionate impact that an early EOS token could have on WER if decoding in terminal EOS mode. Hence, the probability of predicting the EOS token is modified according to:
def modify(logit_eos: float, eos_alpha: float, eos_beta: float) -> float:

	logit_eos = eos_alpha * logit_eos

	if eos_beta > 0 and logit_eos < log(eos_beta):
	   return -float("inf")

	return logit_eos
In predict mode, when eos_alpha == 1 and eos_beta == 0 no modification is made to the output probabilities (hence these will be referred to as the identity parameters) which corresponds to the training environment.
Early termination at EOS and EP latency
One of the use cases for endpointing is triggering some kind of action once a speaker has completed a sentence, e.g. dispatching a user’s request from a voice assistant. If the termination of the ASR is too eager, it may cut off the user. EP latency, the time between the user finishing speaking and model detecting the EOS, must be minimized without harming WER. To simulate the WER effect of cutting off the user, the model has an --eos_is_terminal option. This will trim transcripts after an EOS token.
If you run a validation with --calculate_emission_latency you will see the EOS latency statistics calculated as well. This includes an eos_frac which is the proportion of utterances that are terminated by the EOS token.
Silence termination (VAD)
There is a non-speech detection fallback if the model fails to endpoint. This is off by default - to turn on set --eos_vad_threshold=<value in seconds>. This will trim decodings after a silence longer than the threshold is detected.
For the greedy decoder silence termination is triggered by n-consecutive seconds of blank tokens.
For the beam decoder silence termination is triggered if the difference between the timestamp of the most recent non-blank and the current decoding timestamp is greater than n. This check is performed when a final is emitted, such that there is only one beam.
Conditional Training
Conditional training allows a single ASR model to generate transcripts in different formats by conditioning its output on a given prompt. Currently, this is used to switch between producing text with casing and punctuation versus lowercased, un-punctuated text.
Motivation
For ASR, generating normalized text (lowercase, no punctuation) is an easier task than generating fully formatted text. By collapsing multiple written forms (e.g., “hello.”, “Hello?”, “hello!”) into a single target (“hello”), the model can achieve a lower WER.
Conditional training enables training a single model that can produce both highly accurate, unformatted text and more readable, formatted text.
How It Works
Conditional training works by prepending a control token to the beginning of the target transcript during training.
<pnc>: This token prompts the model to produce a transcript with punctuation and casing.<nopnc>: This token prompts the model to produce a lowercased transcript with no punctuation.
During training, each utterance is randomly assigned either the formatted (<pnc>) or unformatted (<nopnc>) transcript version. The probability of selecting the <pnc> version is controlled by the --pnc_prob argument.
Experimentally, a probability of 0.25 was found to yield the best overall WER for both decoding modes (<pnc> and <nopnc>), without negatively impacting the model’s ability to produce formatted text (PER remained virtually unchanged). This result indicates that the model only needs to see a relatively small fraction of punctuated, cased transcripts to effectively learn formatting.
The training process is as follows:
- The full sequence,
prompt (control token) + transcript, is fed into the model’s prediction network. - The prediction network outputs hidden states for the entire sequence.
- The hidden states corresponding to the initial
promptare stripped away. - The remaining hidden states, corresponding only to the
transcript, are passed to the joint network.
This method, a form of teacher-forcing, conditions the model’s output without teaching it to predict the prompt tokens themselves.
Usage
To enable conditional training, add the --conditional flag to your training command.
./scripts/train.sh \
  # ... other args ...
  --conditional
Adjust the sampling probability between formatted and unformatted transcripts with the --pnc_prob argument (default 0.25):
./scripts/train.sh \
  # ... other args ...
  --conditional \
  --pnc_prob 0.5
You must add the following to user_tokens in the model config (.yaml) before training:
  pnc: "<pnc>"
  nopnc: "<nopnc>"
Next Steps
Having trained a conditional model, go to the conditional decoding docs to select the output format at validation/inference time using a prefix.
End of input (EOI) ‘token’
During training/validation if the append_EOI option is set to true in the
configuration file, like:
input_val: # or input_train
  audio_dataset:
    append_EOI: true
Then a special EOI mel-spectrogram is appended to the end of each audio sample. This communicates to the model that the audio sample is about to terminate and allows the model to ‘dump’ any internally buffered predictions. Empirically this has proven to reduce WER.
During inference on the FPGA this token is appended at the close of stream automatically.
EOI-drop regularization
Previously, the un-warned termination incentivised early emissions to minimise
the risk of not emitting in time. Hence, the EOI token increases emission
latency. To counter this, a fraction of the training utterances randomly have
their EOI tokens removed. This is controlled via the --eoi_drop_fraction
argument and defaults to 0.5 (50%).
Checkpoint Averaging
Vaswani et. al. 2017 and Izmailov et. al. 2018 average the last N checkpoints during training, which leads to better generalisations and flatter optima. Wortsman et. al. 2022 propose model soups, whereby weights of multiple fine-tuned models are averaged to produce a single model that combines the strengths of the individual fine-tuned models. We have also found checkpoint averaging to improve accuracy (~1-2% relative reduction in WER), by averaging the best N checkpoints (from the same training run) based on validation WER.
To average the weights of a set of checkpoints, run the following command:
python caiman_asr_train/export/checkpoint_averaging.py --ckpts path/to/ckpt1.pt path/to/ckpt2.pt path/to/ckpt3.pt --output_path path/to/avg_ckpt.pt --model_config path/to/config.yaml
This script simply averages the weights of a list of checkpoints, and does not find the best N checkpoints from a given training run - this must be done manually at the moment, for example, by checking tensorboard logs.
By default, CAIMAN-ASR already uses exponential moving average (EMA) weights, which stabilise training and lead to smoother convergence by maintaining a running average of model weights, with greater weighting on the most recent model weights. However, checkpoint averaging can provide an improvement on top of EMA weights.
Validation
Validation Command
Quick Start
To run validation, execute:
./scripts/val.sh
By default, a checkpoint saved at /results/RNN-T_best_checkpoint.pt, with the testing-1023sp_run.yaml model config, is evaluated on the /datasets/LibriSpeech/librispeech-dev-clean-flac.json manifest.
Arguments
Customise validation by specifying the --checkpoint, --model_config, and --val_manifests arguments to adjust the model checkpoint, model YAML configuration, and validation manifest file(s), respectively.
Predictions are saved as described here.
See args/val.py and
args/shared.py
for the complete set of arguments and their respective docstrings.
Further Detail
- All references and hypotheses are normalized with the Whisper normalizer before calculating WERs, as described in the WER calculation docs. To switch off normalization, modify the respective config file entry to read
standardize_wer: false. - During validation the state resets technique is applied by default in order to increase the model’s accuracy.
- The model’s accuracy can be improved by using beam search and an n-gram language model.
- Validating on long utterances is calibrated to not run out of memory on a single 11 GB GPU. If a smaller GPU is used, or utterances are longer than 2 hours, refer to this document.
Next Step
See the hardware export documentation for instructions on exporting a hardware checkpoint for inference on an accelerator.
WER Calculation
WER Formula
Word Error Rate (WER) is a metric commonly used for measuring the performance of Automatic Speech Recognition (ASR) systems.
It compares the hypothesis transcript generated by the model with the reference transcript, which is considered to be the ground truth. The metric measures the minimum number of words that have to either be substituted, removed, or inserted in the hypothesis text in order to match the reference text.
For example:
Hypothesis: the       cat  and the brown dogs sat on the long bench
Reference:  the black cat  and the brown dog  sat on the      bench
In the hypothesis there are:
- 1 deletion error (word “black”),
- 1 substitution error (“dogs” instead of “dog”), and
- 1 insertion error (word “long”), in a total of 11 words in the reference text.
The WER for this transcription is:
$$ WER = \frac{S + D + I}{N} \times 100 = \frac{1 + 1 + 1}{11} \times 100=27.27\% $$
WER Standardization
Before the calculation of the WER, when standardize_wer: true in the yaml config,
the text of both hypotheses and references is standardized, so that the model accuracy is
not penalised for mistakes due to differences in capitalisation, punctuation, etc.
Currently, CAIMAN-ASR uses the Whisper EnglishSpellingNormalizer. The Whisper standardization rules applied are the following:
- Remove text between brackets (
< >or[ ]). - Remove punctuation (parentheses, commas, periods etc).
- Remove filler words like hmm, uh, etc.
- Substitute contractions with full words, e.g. won’t -> will not.
- Convert British into American English spelling, e.g. standardise -> standardize. The list of words are included in the file english.json
We additionally apply the following transformations:
- Remove diacritics (“café” becomes “cafe”)
- Lowercase the text
- Expand digits and symbols into words (“$1.02” becomes “one dollar two cents”, “cats & dogs” becomes “cats and dogs”)
- Expand common abbreviations (“Dr. Smith” becomes “doctor smith”)
For example:
Hypothesis:     that's  what we'll standardise in today's example
Reference:  hmm that is what we'll standardize in today's example
After applying the Whisper standardization rules, the sentences are formed:
Hypothesis: that is what we will standardize in today's example
Reference:  that is what we will standardize in today's example
Which are identical, hence the WER=0%.
Character error rate and mixture error rate
Word Error Rate is a useful metric for English and other languages that separate words with spaces.
If you have trained on a language like Chinese, you may instead want to measure the Character Error Rate.
To do this, change the error_rate key in the config:
error_rate: char
If your dataset contains both Chinese and English, you may want to use the Mixture Error Rate. Set the config to:
error_rate: mixture
The implementation of Mixture Error Rate works for Mandarin Chinese, but isn’t tested on other languages. Please contact caiman-asr@myrtle.ai, and Myrtle will be happy to add support for your language.
PER Calculation
PER Formula
The Punctuation Error Rate (PER) is calculated with the same formula as the WER. It is the count of additions, deletions, and substitutions of punctuation marks divided by the number of punctuation marks in the reference text.
Currently, the default punctuation marks used are: , . ?.
They can be amended by parsing a different list with the --punctuation_marks argument.
The punctuation normalisation rules are the following:
    `;` -> `,` semi-colon to comma
    `:` -> `.` colon to period
    `!` -> `.` exclamation mark to period
    `-` -> ` ` hyphen to space
This means that both hypotheses and references are normalized before the calculation.
It can be disabled by parsing the --punctuation_normalization=False argument.
For example:
Hypothesis: Hi  dear. Nice to see you, how are you
Reference:  Hi, dear! Nice to see you. How are you?
The punctuation error rate is calculated as: $$ PER = \frac{S + D + I}{N} \times 100 = \frac{1 + 2 + 0}{4} \times 100=75\% $$
where S is the number of substitutions, D is the number of deletions,
I is the number of insertions, and N=4 is the number of punctuation marks in the reference text.
Note that in the above example the substitution of . for ! is not counted
due to the punctuation normalization.
State Resets
State Resets is a streaming-compatible version of the ‘Dynamic Overlapping Inference’ proposed in this paper. It is a technique that can be used during inference, where the hidden state of the model is reset after a fixed duration. This is achieved by splitting long utterances into shorter segments, and evaluating each segment independently of the previous ones.
State Resets can be amended to include an overlapping region, where each of the segments have prepended audio from their previous segments. The overlapping region of the next segment is used as a warm-up for the decoder between the state resets and tokens emitted in the overlapping region are always from the first segment.
Evaluation with State Resets is on by default, with the following arguments:
--sr_segment=15 --sr_overlap=3
With these arguments, the utterances longer than 15 seconds will be split into segments of 15 seconds each, where, other than the first segment, all segments include the final 3 seconds of the previous segment.
Experiments indicate that the above defaults show a 10% relative reduction in the WER for long-utterances, and do not deteriorate the short utterance performance.
To turn off state resets, set --sr_segment=0.
At inference time
The user can configure whether to use state resets on the CAIMAN-ASR server. More information can be found here.
See also
State resets is applied at inference-time. A training-time feature, RSP can be used in conjunction with state-resets to further reduce WERs on long utterances.
Beam search decoder
By default validation is carried out using a greedy decoder. To instead use a beam decoder, run
./scripts/val.sh --decoder=beam
which runs with a default beam width of 4. To change the beam width, run, for example
./scripts/val.sh --decoder=beam --beam_width=8
All of the beam decoder options described in this page are available in train.sh as well as val.sh.
Adaptive beam search
The time synchronous beam decoder utilises an optimised version of beam search - adaptive beam search - which reduces decoding compute and latency by reducing the number of beam expansions to consider, without degrading WER. Three hypothesis pruning methods are employed:
- Hypotheses with a score less than
beam_prune_score_thresh(default 0.4) below the best hypothesis’ score are pruned. - Tokens with a logprob score less than
beam_prune_topk_thresh(default 1.5) below the most likely token are ignored. - Hypotheses are depth-pruned when their most recent common ancestor is further than
beam_final_emission_threshseconds older than the best hypothesis. This has the effect of forcing finals at at-least this interval, which reduces tail emission latencies.
Reducing beam_prune_score_thresh, beam_prune_topk_thresh, and beam_final_emission_thresh increases pruning aggressiveness; setting them < 0 disables pruning.
Adaptive beam search dynamically adjusts computation based on model confidence, using more compute when uncertain and behaving almost greedily when confident.
Softmax temperature
The beam decoder applies a softmax temperature to the logits. By default the --temperature=1.4 as this was found to improve WER across a range of configurations. Increasing the temperature will increase the beam diversity and make the greedy path less likely.
Fuzzy top-k logits
When using --decoder=beam, the model first calculates the logits for all classes (or tokens),
applies the log-softmax function to get log probabilities, and then selects the top beam-width
tokens to expand the beam.
However, in the hardware-accelerated solution, the I/O of sending the full vocab-size logits tensor from the FPGA to the CPU is a bottleneck. To address this, the hardware-accelerated solution sends a reduced set of logits to the CPU. Specifically, it sends the highest-value logits within some local block of the logits tensor. This enables a ‘fuzzy top-k’ operation which is approximate to the full top-k operation with some small difference.
Our experiments show that using the reduced logits tensor (fuzzy top-k logits) does not impact the model’s WER performance.
Using fuzzy top-k logits
To use a reduced tensor implementation similar to the accelerated version, run the following command:
./scripts/val.sh --num_gpus=2 --decoder=beam --fuzzy_topk_logits
Please note that the evaluation time will increase by ~30% compared to standard beam search, so it is disabled by default.
N-gram language models
N-gram language models are used with beam decoding to improve WER. This is on by default and described in more detail in the N-gram language model documentation.
Keyword boosting
Keyword boosting is available with the beam decoder and described in more detail in the keyword boosting documentation.
N-gram Language Model
An external language model can improve ASR accuracy, especially in out-of-domain contexts with rare or specialised vocabulary. CAIMAN-ASR supports the use of KenLM n-gram language model shallow fusion corrections. We have seen a consistent WER improvement even when the N-gram is trained on ASR data transcripts. As such we automatically generate this N-gram during preprocessing and use it during validation (default for the beam decoder). See the Validation with an N-gram section for more details.
Build an N-gram Language Model
When adapting the preprocessing steps detailed here for your own dataset, you should have generated an n-gram language model trained on your transcripts. To generate an n-gram from a different dataset, see the following steps.
Preparing Data
To train an n-gram with KenLM on transcripts from ASR datasets, the data must first be prepared into the correct format - a .txt file where tokens within a sentence are space-separated and each sentence appears on a new line.
To gather the transcripts from json manifest files, run the following command inside a running container:
python caiman_asr_train/lm/prep_kenlm_data.py --data_dir /path/to/dataset/ --manifests manifest1.json manifest2.json --output_path /path/to/transcripts.txt --model_config configs/config.yaml
To instead gather the transcripts from data in the WebDataset format, run the following command:
python caiman_asr_train/lm/prep_kenlm_data.py --data_dir /path/to/dataset/ --read_from_tar --tar_files file1.tar file2.tar --output_path /path/to/transcripts.txt --model_config configs/config.yaml
Use the same model configuration file that was used for RNN-T. If the n-gram is not trained on data tokenized by the same SentencePiece model, using an ngram language model is likely to degrade WER.
Training an N-gram
To train an n-gram, run the generate_ngram.sh script as follows:
./scripts/generate_ngram.sh [NGRAM_ORDER] /path/to/transcripts.txt /path/to/ngram.arpa /path/to/ngram.binary
For example, to generate a 4-gram, set [NGRAM_ORDER] to 4 as follows:
./scripts/generate_ngram.sh 4 /path/to/transcripts.txt /path/to/ngram.arpa /path/to/ngram.binary
The script will produce an ARPA file, which is a human-readable version of the language model, and a binary file, which allows for faster loading and is the recommended format. Binary files are the only usable format when generating hardware checkpoints, though providing an n-gram is optional.
Validation with an N-gram
During validation, the n-gram language model generated during preprocessing is used, by reading from the following entries in the model configuration file:
ngram:
  ngram_path: /datasets/ngrams/NGRAM_SUBDIR
  scale_factor: 0.05
First, a binary file, named ngram.binary, in NGRAM_SUBDIR is searched for. If not found, an ARPA file - ngram.arpa - is searched for. If neither file exists, the process will crash with an error. To prevent this, use the --skip_ngram flag to disable the use of an n-gram during validation (disabled by default for the greedy decoder):
scripts/val.sh --skip_ngram
The n-gram is enabled by default for the beam decoder and disabled by default for the greedy decoder. To enable it for the greedy decoder use the --no-skip_ngram flag.
scripts/val.sh --decoder greedy --no-skip_ngram
The scale_factor adjusts the scores from the n-gram language model, and this will require tuning for your dataset. Values between 0.05 and 0.1 are empirically effective for improving WER. See the Sweep Scale Factor section below for details on running a sweep across the scale factor.
In addition, the greedy decoder also uses a top_k value, where only the top k candidates are used by the n-gram model to adjust the scores. top_k is set to 5 by default. To use a different value use the --top_k flag
scripts/val.sh --decoder greedy --no-skip_ngram
To use an n-gram that was trained on a different dataset, use the --override_ngram_path argument, which will take precedence over any n-grams in NGRAM_SUBDIR:
scripts/val.sh --override_ngram_path /path/to/ngram.binary
Sweep Scale Factor
To optimize the scale_factor for your n-gram language model, use the sweep_scale_factor.py script.
This script iterates over multiple scale_factor values, performs validation, and updates your model config YAML with the best one based on WER.
Run the following command to perform a sweep:
python caiman_asr_train/lm/sweep_scale_factor.py --checkpoint /path/to/checkpoint.pt --model_config configs/config.yaml --val_manifests /path/to/manifest.json
By default, a sweep is performed across [0.01, 0.025, 0.05, 0.075, 0.1, 0.15, 0.2, 0.25].
To specify custom values, use the --scale_factors argument:
python caiman_asr_train/lm/sweep_scale_factor.py --scale_factors 0.1 0.2 0.3 --checkpoint /path/to/checkpoint.pt --model_config configs/config.yaml --val_manifests /path/to/manifest.json
Automatic batch size reduction
When validating on long utterances with the large model, the encoder may run out of memory even with a batch size of 1.
State resets are implemented by splitting one utterance into a batch
of smaller utterances, even when --val_batch_size=1.
This creates an opportunity to reduce the VRAM usage
further, by processing the ‘batch’ created from one long utterance in smaller
batches, instead of all at once.
The validation script will automatically reduce the batch size if the number
of inputs to the encoder is greater than --max_inputs_per_batch. The default
value of --max_inputs_per_batch is 1e7, which was calibrated to let the
large model validate on a 2-hour-long utterance on an 11 GB GPU.
Note that this option can’t reduce memory usage on a long utterance if state resets is turned off, since the batch size can’t go below 1.
You may wish to reduce the default --max_inputs_per_batch if you have a smaller GPU/longer utterances.
Increasing the default is probably unnecessary, since validation on an 8 x A100 (80GB) system
is not slowed down by the default --max_inputs_per_batch.
Saving Predictions
val.sh dumps the predicted text and per-file WER for a list of input files
to /results/preds_[timestamp]_[step].json, as in this command:
./scripts/val.sh --val_manifests /results/your-inference-list.json
val.sh works whether or not there are correct ground-truth transcripts in your-inference-list.json. If there are,
then the word error rate reported by val will be accurate; if not, then it will be nonsense and should
be ignored. The minimal json file for inference (with 2 wav files) looks like this:
[
  {
    "transcript": "dummy",
    "files": [
      {
        "fname": "relative-path/to/stem1.wav"
      }
    ],
    "original_duration": 0.0
  },
  {
    "transcript": "dummy",
    "files": [
      {
        "fname": "relative-path/to/stem2.wav"
      }
    ],
    "original_duration": 0.0
  }
]
where “dummy” can be replaced by the ground-truth transcript for accurate word error rate calculation,
where the filenames are relative to the --data_dir argument fed to (or defaulted to by) val.sh, and where
the original_duration values are effectively ignored (compared to infinity) but must be present.
Predictions can be generated using other checkpoints by specifying the --checkpoint argument.
User-perceived Latency
User-perceived latency (UPL) is defined as the time difference between the instant when the speaker finishes saying a word and the instant when the word appears as a transcript on a screen. In practice, it can be measured by streaming audio to a server live and measuring the response time for each word. The following table summarizes UPL for base and large models measured by streaming librispeech-dev-clean dataset to an on-site server with an FPGA backend running at maximum RTS.
| Model / decoding | p50 UPL | p90 UPL | p99 UPL |
|---|---|---|---|
| base / greedy | 147 ms | 306 ms | 460 ms |
| large / beam | 158 ms | 428 ms | 968 ms |
UPL is the sum of the following latencies:
- audio frame latency (recording-device/model)
- compute latency (model)
- network latency (network)
- emission latency (model)
Audio Frame Latency
Streaming ASR systems buffer audio for a fixed duration before sending it to the server. The buffer length is typically set to match the audio chunk length used during training. CAIMAN-ASR models were trained on audio chunks of 60 ms. However, the end of the word can appear anytime during buffering, which means that its contribution is half the audio frame length on average (30 ms for CAIMAN-ASR).
Compute Latency
The compute latency measures how long it takes for a model to make a prediction for one audio frame. This latency depends on the model size, accelerator backend, server load, decoding strategy, and whether state resets is turned on. The contribution of the compute latency is strictly additive. The following tables summarize 99th-percentile compute latencies (CL99) at maximum number of real-time streams for an FPGA backend and various setups.
| Model | Parameters | Decoding | CL99 | CL99 + state resets |
|---|---|---|---|---|
| base | 85M | greedy | 25 ms | 45 ms |
| base | 85M | beam, width=4 | 80 ms | 50 ms |
| large | 196M | greedy | 25 ms | 55 ms |
| large | 196M | beam, width=4 | 40 ms | 60 ms |
Network Latency
The network latency corresponds to sending the audio chunk to the server and receiving a response back. The contribution of the network latency is roughly equal to the round-trip response time, as measured using ping. In case the solution is deployed on-premise, the expected value is well below 1 ms. In the case the solution is deployed on cloud, the network latency can exceed 100 ms.
Emission Latency
The emission latency (EL) is explained in detail in this document. Together with the network latency, it is the only latency the user can directly influence, as explained in here. Its contribution is strictly additive. The table below summarizes emission latency for the latest models averaged across all HF Leaderboard evaluation datasets.
| Model | Median EL |
|---|---|
| base | 107 ms |
| large | 58 ms |
Emission Latency
Emission latency (EL) is defined by the time difference between the end of a spoken word in an audio file and when the model outputs the final token for the corresponding word, minus the mean frame latency. After the model receives the final audio frame of a word, it might not predict the word until it has heard a few more frames of audio. EL measures this delay.
To calculate the model’s EL during validation, pass the --calculate_emission_latency flag, e.g.
./scripts/val.sh --calculate_emission_latency
When this flag is enabled, CTM files containing model timestamps are exported to --output_dir.
Emission latencies are calculated by aligning the model-exported CTM files with corresponding ground truth CTM files.
Ground truth CTM files are expected to be located in the same directory as the validation manifest or tar files and should share the same base name e.g.
if --data_dir=/path/to/dataset and --val_manifests=data.json, then the assumed filepath of the ground truth CTM file is /path/to/dataset/data.ctm.
See Forced Alignment for details on producing ground truth CTM files.
The script outputs the mean latency, as well as the 50th, 90th, and 99th percentile latencies.
Moreover, the Token Usage Rate is reported. This is the proportion of words’ timestamps that are used in the emission latency calculation.
If one already has model-exported CTM files and corresponding ground truth files, the measure_latency.py script can be used instead of running a complete validation run. To do so, run the script with paths to the ground truth and model CTM files:
python caiman_asr_train/latency/measure_latency.py --gt_ctm /path/to/ground_truth.ctm --model_ctm /path/to/model.ctm
To include substitution errors in latency calculations, add the --include_subs flag:
python caiman_asr_train/latency/measure_latency.py --gt_ctm /path/to/ground_truth.ctm --model_ctm /path/to/model.ctm --include_subs
To export a scatter plot of EL against time from the start of the sequence, pass a filepath to the optional --output_img_path argument e.g.
python caiman_asr_train/latency/measure_latency.py --gt_ctm /path/to/ground_truth.ctm --model_ctm /path/to/model.ctm --output_img_path /path/to/img.png
EL logging is also compatible with val_multiple.sh.
Forced Alignment
The script forced_align.py is used to align audio recordings with their corresponding transcripts, producing ground truth timestamps for each word.
To perform forced alignment, execute the script with the required arguments e.g.
python caiman_asr_train/latency/forced_align.py --dataset_dir /path/to/dataset --manifests data.json
By default, CTM files are exported to the same location as the manifest files and share the same base name e.g.
if --dataset_dir /path/to/dataset and --manifests data.json, then the default filepath of the CTM file is /path/to/dataset/data.ctm.
The output directory to which CTM files are saved can be changed as follows:
python caiman_asr_train/latency/forced_align.py --dataset_dir /path/to/dataset --manifests manifest.json --output_dir /custom/output/directory
Multiple manifest files can be passed to the script e.g.
python caiman_asr_train/latency/forced_align.py --dataset_dir /path/to/dataset --manifests manifest1.json manifest2.json
The script also supports (multiple) tar files:
python caiman_asr_train/latency/forced_align.py --read_from_tar --tar_files data1.tar data2.tar --dataset_dir /path/to/dataset
Both absolute and relative paths are accepted for --manifests and --tar_files.
By default, utterances are split into 5 minute segments. This allows us to perform forced alignment on datasets with very long utterances (e.g. Earnings21) without encountering memory issues.
Most datasets have utterances shorter than 5 minutes and are therefore unaffected by this.
To change the segment length, pass the optional --segment_len argument with an integer number of minutes e.g.
python caiman_asr_train/latency/forced_align.py --segment_len 15 --dataset_dir /path/to/dataset --manifests data.json
There is also a CPU option:
python caiman_asr_train/latency/forced_align.py --cpu --dataset_dir /path/to/dataset --manifests data.json
CTM
CTM (Conversation Time Mark) format is space separated file with entries:
<recording_id> <channel_id> <token_start_time> <token_duration> <token_value>
and an optional sixth entry <confidence_score>.
CTM allows either token-level or word-level timestamps.
Next Steps
To improve the emission latency of your model, consider training with a Delay Penalty.
Word timestamps
In the following discussion timestamps refers only to the timestamps of the finals.
The model emits timestamps for each token, these can be grouped into word timestamps which define the start/end time of each word.
Average accumulated shift
The accuracy of the word timestamps is quantified with the average accumulated shift (AAS) metric (see https://arxiv.org/pdf/2301.12343). This is defined as:
$$ \text{AAS} = \frac{1}{N} \sum_{i=1}^N \frac{ \left| t_i^{\text{predStart}} - t_i^{\text{refStart}} \right| + \left| t_i^{\text{predEnd}} - t_i^{\text{refEnd}} \right| } {2} $$
This can be understood as the average absolute difference (in time) between the true start/end time and the model’s predicted start/end time for each word.
Latency
The model’s token level timestamps are known to lag behind real-time (see Emission Latency). To correct for this when estimating word timestamps a latency offset should be subtracted from the token timestamp at the beginning and end of each word. This is supported via the following flags:
--latency_head_offset <value in seconds>
--latency_tail_offset <value in seconds>
In general these require a model/domain/decoder specific calibration.
Measuring AAS
If the --calculate_emission_latency flag is passed to the
Validation script then several AAS related metrics are
measured these include:
"optimal_head_offset":
$$ \text{median} \left\lbrace t_i^{\text{predStart}} - t_i^{\text{refStart}} \mid i \in 1\ldots N \right\rbrace $$
"optimal_tail_offset":
$$ \text{median} \left\lbrace t_i^{\text{predEnd}} - t_i^{\text{refEnd}} \mid i \in 1\ldots N \right\rbrace $$
"raw_AAS": The AAS calculated without any latency correction"fixed_AAS": The AAS calculated with the head/tail offset supplied via the CLI flags"corrected_AAS": The AAS calculated using the computed optimal head/tail offset
Keyword boosting
Keyword boosting is a technique to improve the recognition of domain-specific words/phrases and proper nouns. It works by boosting the probability of specific tokens at inference time. The framework is inspired by TurboBias [1].
The framework can support up to 100 keywords, although 10-40 is recommended for optimal performance.
While keyword boosting is enabled for both greedy and beam decoding, it is designed to work well with beam decoding and may not perform well with greedy decoding.
Keyword list format
Create a json containing your keywords, in the following format:
{
  "keywords": [
    "car",
    " cat",
    " Bat ",
    " New York "
  ]
}
Keywords are case and space sensitive, they should be formatted using the same character-set as the output of your decoder.
In the above example, the framework would increase
the probabilities of words containing the sequence car,
words starting with cat, the whole word Bat,
and the whole phrase New York.
Keyword metrics
When a valid JSON is passed to --keywords_path, additional metrics are calculated:
- Biased WER (b-WER): WER of hypotheses that contain at least one keyword in the reference.
- Unbiased WER (u-WER): WER of hypotheses that do not contain any keywords in the reference.
- Precision: TP/(TP+FP) - Accuracy of keyword predictions (i.e., how many of the keywords that the model predicted were correct).
- Recall: TP/(TP+FN) - Model’s ability to find all keywords (i.e., what proportion of keywords in the ground truth did the model correctly predict).
- F1 Score: Harmonic mean of precision and recall.
Usage
Compute metrics
To compute metrics on your keywords, pass a valid JSON to the --keywords_path argument:
./scripts/val.sh \
  # ... other args ...
  --keywords_path path/to/words.json
Boost keywords
To boost the keywords, additionally supply the --boost_keywords flag:
./scripts/val.sh \
  # ... other args ...
  --keywords_path path/to/words.json
  --boost_keywords
How it works
We build an Aho-Corasick automaton over your phrases. Each node has a depth-shaped potential:
shape(d) =
            0                     if d = 0
            c0                    if d = 1
            c0*beta + ln(d)       if d >= 2

S(d) = context_score * shape(d)
At each token, we follow AC failure links (refunding partial bias), then take a goto edge (adding the incremental bias). Completed keywords keep their reward; partial near-misses net ≈ 0. This design is deterministic, efficient, and robust to overlaps, large lists and out-of-domain distractors.
Hyperparameters
--keyword_boost_c0(default 0.3): start-of-keyword boost (depth 1).--keyword_boost_beta(default 0.9): extra front-loading at depth 2; later steps taper via ln(depth).--keyword_boost_context_score(default 0.4 for greedy decoder, 1.0 for beam decoder): global strength.
Recommendations
Keep c0 and beta at their defaults; they work well across domains
and for different keyword list sizes (up to 100).
-
Greedy Decoder
If you wish to trade F1 vs WER (figure 1), adjust only
context_score:-
Try 0.1-0.6
-
Lowering towards 0.1 -> slightly better WER and precision, slightly lower F1 and recall.
-
Exceeding 0.6 typically degrades both WER and F1.
-
Default 0.4 is recommended.
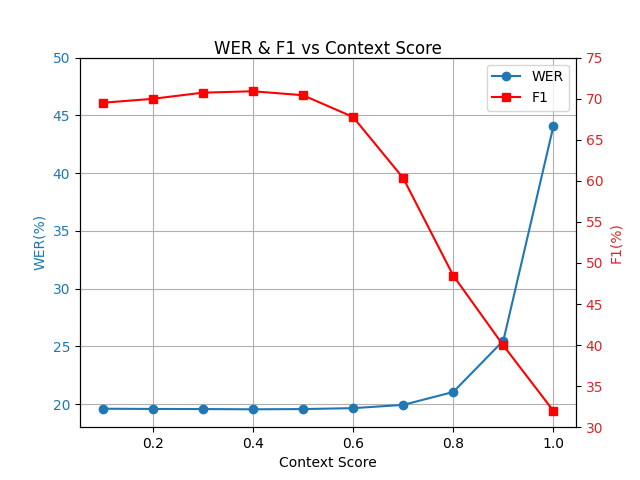
Figure 1: WER and F1 vs context score, averaged across 4 test datasets with 10-15 keywords each.
-
-
Beam Decoder
If you wish to trade F1 vs WER (figure 2), adjust only
context_score:-
Try 0.6-1.0
-
Lowering towards 0.6 -> slightly better WER and precision, slightly lower F1 and recall.
-
Exceeding 1.0 typically degrades both WER and F1.
-
Default 1.0 is recommended.
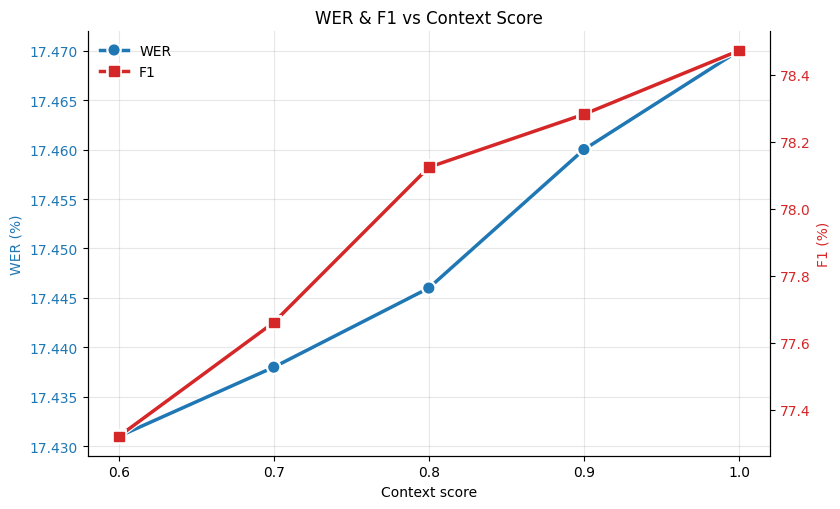
Figure 2: WER and F1 vs context score, averaged across 4 test datasets with 10-15 keywords each.
See figure 3 for scaling with the number of boosted keywords. Guidance:
-
Recommended: 10-40 keywords
-
Maximum: 100 keywords
-
Although the framework is remarkably robust to out-of-domain “distractors”, best results come from keeping the list of keywords relevant.
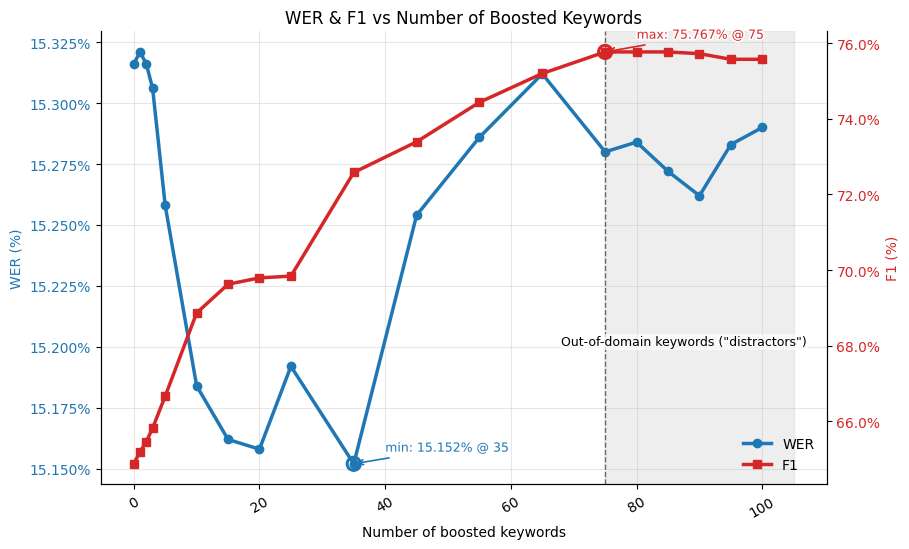 Figure 3: WER and F1 versus the number of boosted keywords for one test dataset. The shaded region (>75) adds out-of-domain “distractor” phrases in addition to the original 75 relevant ones.
-
Expected Results
When boosting is enabled:
- F1: 10-40% relative improvement
- WER: up to ~1% relative improvement
Actual gains vary by domain, audio conditions, and list composition.
References
[1] A. Andrusenko, V. Bataev, L. Grigoryan, V. Lavrukhin, and B. Ginsburg, ‘TurboBias: Universal ASR Context-Biasing powered by GPU-accelerated Phrase-Boosting Tree’, arXiv [eess.AS]. 2025.
Export inference checkpoint
To run your model on Myrtle.ai’s hardware-accelerated inference server you will need a hardware checkpoint. This is a training checkpoint with additional data such as mel-bin mean and variances as described here.
By default, train.sh will automatically create hardware checkpoints for your
best and last checkpoints.
If your best checkpoint is /results/RNN-T_best_checkpoint.pt,
you can find the hardware checkpoint at /results/RNN-T_best_checkpoint.hw.pt.
Creating a hardware checkpoint manually
If you want more customization,
you can also create a hardware checkpoint from
a training checkpoint using the hardware_ckpt.py script.
To create a hardware checkpoint run:
python ./caiman_asr_train/export/hardware_ckpt.py \
    --ckpt /results/RNN-T_best_checkpoint.pt \
    --config <path/to/config.yaml> \
    --output_ckpt /results/hardware_checkpoint.example.pt
where /results/RNN-T_best_checkpoint.pt is your best checkpoint.
The script should take a few seconds to run.
The generated hardware checkpoint will contain the sentencepiece model specified in the config file and the dataset mel stats.
The hardware checkpoint will also include the binary n-gram generated during preprocessing, as specified by the ngram_path field in the config file.
However, this is optional, and can be skipped by passing the --skip_ngram flag:
python ./caiman_asr_train/export/hardware_ckpt.py \
    --ckpt /results/RNN-T_best_checkpoint.pt \
    --config <path/to/config.yaml> \
    --output_ckpt /results/hardware_checkpoint.example.pt
    --skip_ngram
To include an n-gram that was generated on a different dataset, use the --override_ngram_path argument:
python ./caiman_asr_train/export/hardware_ckpt.py \
    --ckpt /results/RNN-T_best_checkpoint.pt \
    --config <path/to/config.yaml> \
    --output_ckpt /results/hardware_checkpoint.example.pt \
    --override_ngram_path /path/to/ngram.binary
Inference flow
The CAIMAN-ASR server provides low-latency, real-time streaming ASR workloads behind a convenient WebSocket API. This section describes how to set up the CAIMAN-ASR server for inference.
To use the inference you need to obtain a license, program the FPGA and then run the server docker image (or the demo image for a quick start).
Licensing
Licenses are required for each FPGA, and each license is tied to a particular FPGA’s unique identifier. Licenses may also have a maximum version number and release date that they support. Additional or replacement licenses can be purchased by contacting Myrtle.ai or Achronix.
The CAIMAN-ASR server can run in “CPU mode”, where the FPGA is not used and all inference is done on the CPU. This does not require a license and is useful for testing; however the throughput of the CPU is much lower. For details of how to run this, see the CAIMAN-ASR server documentation.
The directory containing the license file(s) is passed as an argument to the start_server script.
Programming the Achronix Speedster7t FPGA
The bitstream that goes on the FPGA supports all the model architectures, and it only needs to be reprogrammed when Myrtle.ai releases an updated bitstream. If you have received a demo system from Achronix or Myrtle.ai then the bitstream will likely already have been set up for you and you will not need to follow this step.
Checking that the card has enumerated
You can check if the card has enumerated properly if lspci lists any devices with ID 12ba:0069
$ lspci -d 12ba:0069
25:00.0 Non-Essential Instrumentation [1300]: BittWare, Inc. Device 0069 (rev 01)
There should be a result for each card. If the card has not enumerated properly, you may need to power cycle the machine.
Flashing via JTAG
The board needs to have a JTAG cable connected to enable it to be flashed. See the VectorPath documentation for more information on how to connect the JTAG cable.
You also need to have the Achronix ACE software installed on the machine. To acquire the Achronix tool suite, please contact Achronix support. A license is not required, as “lab mode” is sufficient for flashing the FPGA.
Enter the ACE console:
sudo rlwrap /opt/ACE_9.1.1/Achronix-linux/ace -lab_mode -batch
Then run the following command:
jtag::get_connected_devices
This will list the devices connected via JTAG. As above, there should be one device ID for each card. If you have multiple devices connected you will need to repeat the programming step for all of them.
Set the jtag_id variable to the device ID (X) of the card you want to program:
set jtag_id X
Then run the following commands to program the card:
spi::program_bitstream config2 bitstream_page0.flash 1 -offset 0 -device_id $jtag_id -switch30
spi::program_bitstream config2 bitstream.flash 4 -offset 4096 -device_id $jtag_id -switch30
Now power-cycle the machine and the card should be programmed. A reboot is not sufficient.
CAIMAN-ASR server release bundle
Release name: caiman-asr-server-<version>.run
This release bundle contains all the software needed to run the Myrtle.ai CAIMAN-ASR server in a production environment. This includes the server docker image, a simple Python client, and scripts to start and stop the server. Additionally, it contains a script to compile a hardware checkpoint into a CAIMAN-ASR checkpoint. Two model architectures are supported:
baselarge
The CAIMAN-ASR server supports two backends: CPU and FPGA. The CPU backend is not real time, but
can be useful for testing on a machine without an Achronix Speedster7t PCIe card
installed. The FPGA backend is able to support 2000 concurrent transcription
streams per card with the base model and 800 with the large model.
Quick start: CPU backend
-
Load the CAIMAN-ASR server docker image:
docker load -i docker-asr-server.tgz -
Start the CAIMAN-ASR server with the hardware checkpoint:
./start_asr_server.sh --rnnt-checkpoint compile-model-checkpoint/hardware_checkpoint.base.example.pt --cpu-backend -
Once the server prints “Server started on port 3030”, you can start the simple client. This will send a librispeech example wav to the CAIMAN-ASR server and print the transcription:
cd simple_client
./build.sh # only needed once to install dependencies
./run.sh
cd ..
To detach from the running docker container without killing it, use ctrl+p followed by ctrl+q.
-
Stop the CAIMAN-ASR server(s)
./kill_asr_servers.sh
Quick start: FPGA backend
If you are setting up the server from scratch you will need to flash the Achronix Speedster7t FPGA with the provided bitstream. If you have a demo system provided by Myrtle.ai or Achronix, the bitstream will already be flashed. See the Programming the card section for instructions on flashing the FPGA before continuing.
Unlike with the CPU backend, you will need to compile the hardware checkpoint into a CAIMAN-ASR checkpoint (step 2 below). For more details on this process, see the Compiling weights section.
-
Load the CAIMAN-ASR server docker image
docker load -i docker-asr-server.tgz -
Compile an example hardware checkpoint to a CAIMAN-ASR checkpoint
cd compile-model-checkpoint ./build_docker.sh ./run_docker.sh hardware_checkpoint.base.example.pt caiman_asr_checkpoint.base.example.pt cd .. -
Start the CAIMAN-ASR server with the CAIMAN-ASR checkpoint (use
--card-id 1to use the second card).--license-dirshould point to the directory containing your license files. See the Licensing section for more information../start_asr_server.sh --rnnt-checkpoint compile-model-checkpoint/caiman_asr_checkpoint.base.example.pt --license-dir "./licenses/" --card-id 0To detach from the running docker container without killing it, use ctrl+p followed by ctrl+q.
-
Once the server prints “Server started on port 3030”, you can start the simple client. This will send a librispeech example wav to the CAIMAN-ASR server and print the transcription:
cd simple_client ./build.sh # only needed once to install dependencies ./run.sh cd .. -
Stop the CAIMAN-ASR server(s)
./kill_asr_servers.sh
State resets
State resets improve the word error rate of the CAIMAN-ASR server on long utterances by resetting the hidden state of the model after a fixed duration.
This improves the accuracy but reduces the number of real-time streams that can be supported by about 25%.
If your audio is mostly short utterances (less than 60s), you can disable state resets to increase the number of real-time streams that can be supported.
State resets are switched on by default, but they can be disabled by passing the --no-state-resets flag to the ./start_server script.
More information about state resets can be found here.
Beam decoding
Beam decoding improves WER but reduces RTS;
see here for more details.
Beam search is switched on by default,
but it can be disabled by passing the --no-beam-decoder flag.
More information about beam decoding is here.
When decoding with beam search, the server will return two types of response, either ‘partial’ or ‘final’. For more details, see here.
EOS decoding
The handling of EOS tokens at inference time can be controlled via flags passed to the ASR server. See here for a description of the following terminology. The inference server decoding modes are:
- Classic (default or pass
--eos-mode classic) - The model internally predicts<EOS>tokens and feeds them back into the prediction network however, the<EOS>tokens are stripped from the responses. Hence, they are invisible to the user. The identity parameters are used in the decoder. - Stream EOS (pass
--eos-mode stream) - This mode operates exactly as the Classic mode, except that the<EOS>tokens are returned to the user. In this mode with the beam decoder, partials/finals are entirely orthogonal to<EOS>. - Terminal EOS (pass
--eos-mode terminal) - In this mode the endpointing hyper-parameters can be controlled via the--eos-multiplier eos_alphaand--eos-threshold eos_betaflags to control the end-pointing aggressiveness. If the model predicts an<EOS>token the server will close the connection. With the beam decoder the<EOS>token will always arrive in the last final if terminated by an EOS.
Silence-termination (VAD)
The ASR server can fallback to a VAD in case the model misses an EOS token. This can be enabled with the --silence-terminate-seconds your_time_in_seconds flag. This operates orthogonally to terminal EOS mode. However, it is recommended to set --silence-terminate-seconds 2 when using terminal EOS mode, as Myrtle.ai has found this to have minimal impact on WER.
Connecting to the websocket API
The websocket endpoint is at ws://localhost:3030.
See Websocket API for full documentation of the websocket interface.
The code in simple_client/simple_client.py is a simple example of how to connect to the CAIMAN-ASR server using the websocket API.
The code snippets below are taken from this file, and demonstrate how to connect to the server in Python.
Initially the client needs to open a websocket connection to the server.
ws = websocket.WebSocket()
ws.connect(
    "ws://localhost:3030/asr/v0.1/stream?content_type=audio/x-raw;format=S16LE;channels=1;rate=16000"
)
Then the client can send audio data to the server.
for i in range(0, len(samples), samples_per_frame):
    payload = samples[i : i + samples_per_frame].tobytes()
    ws.send(payload, websocket.ABNF.OPCODE_BINARY)
The client can receive the server’s response on the same websocket connection. Sending and receiving can be interleaved.
msg = ws.recv()
print(json.loads(msg)["alternatives"][0]["transcript"], end="", flush=True)
When the audio stream is finished the client should send a blank frame to the server to signal the end of the stream.
ws.send("", websocket.ABNF.OPCODE_BINARY)
The server will then send the final transcriptions and close the connection.
The server consumes audio in 60ms frames, so for optimal latency the client should send audio in 60ms frames. If the client sends audio in smaller chunks the server will wait for a complete frame before processing it. If the client sends audio in larger chunks there will be a latency penalty as the server waits for the next frame to arrive.
A more advanced client example in Rust is provided in caiman-asr-client; see Testing inference performance for more information.
Convert PyTorch checkpoints to CAIMAN-ASR programs
Release name: caiman-asr-server-<version>/compile-model-checkpoint
This is a packaged version of the CAIMAN-ASR model compiler, which can be used to convert PyTorch checkpoints to CAIMAN-ASR checkpoints. The CAIMAN-ASR checkpoint contains the instructions for the model to enable CAIMAN-ASR acceleration. These instructions depend on the weights of the model, so when the model is changed, the CAIMAN-ASR checkpoint needs to be recompiled.
The flow to deploy a trained CAIMAN-ASR model is:
- Convert the training checkpoint to a hardware checkpoint following the steps in the Exporting a checkpoint section. Hardware checkpoints can be used with the CAIMAN-ASR server directly if you specify
--cpu-backend. - Convert the hardware checkpoint to a CAIMAN-ASR checkpoint with the
compile-model.pyscript in this directory. CAIMAN-ASR checkpoints can be used with the CAIMAN-ASR server with either of the CPU or FPGA backends.
Usage
The program can be run with docker or directly if you install the dependencies.
Docker
Install docker and run the following commands:
./build_docker.sh
./run_docker.sh path/to/hardware-checkpoint.pt output/path/to/caiman-asr-checkpoint.pt
Without docker
Ensure that you are using Ubuntu 20.04 - there are libraries required by the CAIMAN-ASR assembler that may not be present on other distributions.
pip3 install -r ./requirements.txt
./compile-model.py \
  --hardware-checkpoint path/to/hardware-checkpoint.pt \
  --mau-checkpoint output/path/to/caiman-asr-checkpoint.pt
These commands should be executed in the compile-model-checkpoint directory
otherwise the python script won’t be able to find the mau_model_compiler binary.
WebSocket API for Streaming Transcription
Connecting
To start a new stream, the connection must first be set up. A WebSocket
connection starts with a HTTP GET request with header fields Upgrade: websocket and Connection: Upgrade as per
RFC6455.
GET /asr/v0.1/stream HTTP/1.1
Host: api.myrtle.ai
Upgrade: websocket
Connection: Upgrade
Sec-WebSocket-Key: dGhlIHNhbXBsZSBub25jZQ==
Sec-WebSocket-Protocol: stream.asr.api.myrtle.ai
Sec-WebSocket-Version: 13
If all is well, the server will respond in the affirmative.
HTTP/1.1 101 Switching Protocols
Upgrade: websocket
Connection: Upgrade
Sec-WebSocket-Accept: s3pPLMBiTxaQ9kYGzzhZRbK+xOo=
Sec-WebSocket-Protocol: stream.asr.api.myrtle.ai
The server will return HTTP/1.1 400 Bad Request if the request is invalid.
Request Parameters
Parameters are query-encoded in the request URL.
Content Type
| Parameter | Required | Default |
|---|---|---|
content_type | Yes | - |
Requests can specify the audio format with the content_type parameter. If the content type is not
specified then the server will attempt to infer it. Currently only audio/x-raw is supported.
Supported content types are:
audio/x-raw: Unstructured and uncompressed raw audio data. If raw audio is used then additional parameters must be provided by adding:format: The format of audio samples. Only S16LE is currently supportedrate: The sample rate of the audio. Only 16000 is currently supportedchannels: The number of channels. Only 1 channel is currently supported
As a query parameter, this would look like:
content_type=audio/x-raw;format=S16LE;channels=1;rate=16000
Model Identifier
| Parameter | Required | Default |
|---|---|---|
model | No | "general" |
Requests can specify a transcription model identifier.
Model Version
| Parameter | Required | Default |
|---|---|---|
version | No | "latest" |
Requests can specify the transcription model version. Can be "latest" or a specific version id.
Model Language
| Parameter | Required | Default |
|---|---|---|
lang | No | "en" |
The BCP47 language tag for the speech in the audio.
Prefix
| Parameter | Required | Default |
|---|---|---|
prefix | No* | None |
A prefix may be supplied to the model, allowing users to select between punctuated and cased output (<pnc>)
and lowercase output (<nopnc>). If specified, the prefix is applied for the duration of the WebSocket session.
Example:
prefix=<pnc>
*Note: Prefix usage depends on the deployed model on the server: latest CAIMAN-ASR pretrained models expect a prefix and will perform suboptimally without one, whilst older models must not receive one, and user-trained models require it only if trained conditionally.
Keyword Boosting
| Parameter | Required | Default |
|---|---|---|
keywords | No | None |
Keyword boosting allows you to provide a list of words or phrases that are prioritised during decoding. CAIMAN-ASR supports keyword boosting of up to 100 keywords.
Keywords are supplied by repeating the keywords query parameter in the WebSocket request URL.
For each keyword, append &keywords=<KEYWORD> to the query string.
For example:
&keywords=caiman&keywords=asr
Max Number of Alternatives
| Parameter | Required | Default |
|---|---|---|
alternatives | No | 1 |
The maximum number of alternative transcriptions to provide.
Supported Models
| Model id | Version | Supported Languages |
|---|---|---|
| general | v1 | en |
Request Frames
For audio/x-raw audio, raw audio samples in the format specified in the
format parameter should be sent in WebSocket Binary frames without padding.
Frames can be any length greater than zero.
A WebSocket Binary frame of length zero is treated as an end-of-stream (EOS) message.
Response Frames
Response frames are sent as WebSocket Text frames containing JSON.
{
  "start": 0.0,
  "end": 2.0,
  "is_provisional": false,
  "alternatives": [
    {
      "transcript": "hello world",
      "confidence": 1.0
    }
  ]
}
API during greedy decoding
start: The start time of the transcribed interval in secondsend: The end time of the transcribed interval in secondsis_provisional: Always false for greedy decoding (but can be true for beam decoding)alternatives: Contains at most one alternative for greedy decoding (but can be more for beam decoding)transcript: The model predictions for this audio interval. Not cumulative, so you can get the full transcript by concatenating all thetranscriptfieldsconfidence: Currently unused
API during beam decoding
When decoding with a beam search, the server will return two types of response, either ‘partial’ or ‘final’ where:
- Partial responses are hypotheses that are provisional and may be removed or updated in future frames
- Final responses are hypotheses that are complete and will not change in future frames
It is recommended to use partials for low-latency streaming applications and finals for the ultimate transcription output. If latency is not a concern you can ignore the partials and concatenate the finals.
Detection of finals is done by checking beam hypotheses for a shared prefix. Once this shared prefix is detected and sent in as a final, all following partials and finals will have that prefix removed. Hence it’s possible to get the full transcript by concatenating all the transcript fields in the finals.
Typically it takes no more than 1 second to get finals (and often they are much faster) to ensure a hard-cap on final latency beam time/depth pruning can be enabled, which discards the least likely hypothesis to ensure that the time between final emissions is bounded.
When running the asr server, partial responses are marked with "is_provisional": true and finals with "is_provisional": false and partials can be one of the many "alternatives: [...]".
During a partial response,
the alternatives are ordered from most confident to least.
During every frame other than the last one, the server will send partials and may also send a final. At the last frame, the server will not send any partials, but may send a final if there is outstanding text.
When the server sends a final and a partial for the same frame, the final will be sent first.
Closing the Connection
The client should not close the WebSocket connection, it should send an EOS message and wait for a WebSocket Close frame from the server. Closing the connection before receivng a WebSocket Close frame from the server may cause transcription results to be dropped.
An end-of-stream (EOS) message can be sent by sending a zero-length binary frame.
Errors
If an error occurs, the server will send a WebSocket Close frame, with error details in the body.
| Error Code | Details |
|---|---|
| 400 | Invalid parameters passed. |
| 503 | Maximum number of simultaneous connections reached. |
Testing Inference Performance
Release name: caiman-asr-client-<version>.run
This is a simple client for testing and reporting the latency of the CAIMAN-ASR server. It spins up a configurable number of concurrent connections that each run a stream in realtime.
Running
A pre-compiled binary called caiman-asr-client is provided. The client documentation can be viewed with the
--help flag.
$ ./caiman-asr-client --help
This is a simple client for evaluation of the CAIMAN-ASR server.

It drives multiple concurrent real-time audio channels providing latency figures and transcriptions. In default mode, it spawns a single channel for each input audio file.

Usage: caiman-asr-client [OPTIONS] <INPUTS>...

Options:
      --perpetual
          Every channel drives multiple utterances in a loop. Each channel will only print a report for the first completed utterance

      --concurrent-connections <CONCURRENT_CONNECTIONS>
          If present, drive <CONCURRENT_CONNECTIONS> connections concurrently. If there are more connections than audio files, connections will wrap over the dataset

  -h, --help
          Print help (see a summary with '-h')

WebSocket connection:
      --host <HOST>
          The host to connect to. Note that when connecting to a remote host, sufficient network bandwidth is required when driving many connections

          [default: localhost]

      --port <PORT>
          Port that the CAIMAN-ASR server is listening on

          [default: 3030]

      --connect-timeout <CONNECT_TIMEOUT>
          The number of seconds to wait for the server to accept connections

          [default: 15]

      --quiet
          Suppress printing of transcriptions

      --prefix <PREFIX>
          Prefix to the prediction network to select the output style, either "<pnc>" for punctuated and cased output,
          or "<nopnc>" for lowercase only (more accurate).

          [default: None]


Audio:
  <INPUTS>...
          The input wav files. The audio is required to be 16 kHz S16LE single channel wav
If you want to run it with many wav files you can use find to list all the wav files in a directory (this
will hit a command line limit if you have too many):
./caiman-asr-client $(find /path/to/wav -name '*.wav') --concurrent-connections 1000 --perpetual --quiet
Building
If you want to build the client yourself you need the rust compiler. See https://www.rust-lang.org/tools/install
Once installed you can compile and run it with
$ cargo run --release -- my_audio.wav --perpetual --concurrent-connections 1000
If you want the executable you can run
$ cargo build --release
and the executable will be in target/release/caiman-asr-client.
How the latency is calculated
This client splits the audio in 60ms chunks and sends a chunk every 60ms, so it’s mimicking live audio. The latency is measured by the client, and it is the time from the chunk being sent to the response for that chunk being received. (The CAIMAN-ASR server sends a response for every 60ms chunk it receives, whether or not it has a token for this chunk, so this is always well-defined.)
This means that the reported latency includes the following:
- The time for the packet to go from the client to the server across the network
- The time for the chunk to be processed by the server
- The time for the response to go from the server back to the client.
It doesn’t include:
- The size of the chunk itself (60ms). If you imagine a live stream of audio that starts at t=0, then at t=60ms the first chunk of audio would be sent. Say that the time taken to receive a response from the server is 50ms, then the first response would be received at 110ms. But we don’t say that the latency is 110ms because we don’t include the size of the chunk in the calculation.
The latency reported by the client is the average and p99 for all the chunks in the previous (configurable) reporting period. The latency reported when the transcription comes back is the average and p99 for all the chunks in that transcription.
To prevent each connection sending audio at the same time, the client waits a random length of time (within the frame duration) before starting each connection. This provides a better model of real operation where the clients would be connecting independently.
Troubleshooting
The client uses a file descriptor for each audio connection.
The number of file descriptors available to a process is limited by the operating system.
If you see the error Too many open files, you can increase the limit by adding the following lines
to /etc/security/limits.conf:
* soft nofile 40000
* hard nofile 40000
You can check the limit with:
ulimit -n
Demonstrating live transcription using a local microphone
The live demo client is found in the inference/live_demo_client directory.
This script connects to a running CAIMAN-ASR server and streams audio from your microphone to the server for low-latency transcription.
Step 1: Set up the CAIMAN-ASR server
Follow the instructions provided in Inference Flow to set up the ASR server.
Step 2: Set up the client
Locally, install dependencies:
sudo apt install portaudio19-dev python3-dev # dependencies of PyAudio
pip install pyaudio websocket-client
(Or if you are a Nix user, nix develop will install those)
Then run the client with ./live_client.py --host <host> --port <port> where <host> and <port> are the host and port of the ASR server respectively.
Prefix (punctuation/casing)
Use --prefix to condition the RNN-T prediction network:
<pnc>: punctuated and cased output<nopnc>: lowercase only (slightly more accurate)
For example,
python ./live_client.py --host <host> --port <port> --prefix="<pnc>"
Note: ensure the server is running a model that supports prefix.
Keyword Boosting
CAIMAN-ASR supports keyword boosting of up to 100 keywords. Keyword boosting is a technique to improve the recognition of domain-specific words/phrases and proper nouns, by boosting the probability of specific tokens at inference time.
To provide keywords to the server, use the --keywords argument with a space-separated list of keywords e.g.
python ./live_client.py --keywords caiman asr myrtle
Troubleshooting
If the client raises OSError: [Errno -9997] Invalid sample rate, you may need to
use a different audio input device:
- Run
./print_input_devices.pyto list available input devices - Try each device using (for example)
./live_client.py --input_device 5
Hardware requirements
The following is a guide to the hardware requirements for the CAIMAN-ASR server.
Host requirements
The CAIMAN-ASR server requires a host machine with the following specifications:
- Four CPU cores per VectorPath card
- 4 GB of memory per VectorPath card
- 100 GB of storage
- Ubuntu 22.04 LTS (recommended)
Bandwidth
The server requires 500 Mbits/s of bandwidth per 1000 streams. For example, 2000 streams would require 1 Gbit/s of bandwidth.
The bandwidth is dependent on the number of streams and not the number of cards (one card can handle 2000 streams with the base model or 800 streams with the large model).
This figure has some headroom built in; the measured value on a reliable connection is 700 Mbits/s for 2000 streams.
CAIMAN-ASR demo
Release name: caiman-asr-demo-<version>.run
This software bundle is used for demonstrating the server.
It includes the asr server and a web interface which shows the live transcriptions and latency of the server.
This is not the right software to use for production installations; the docker container doesn’t expose the server port so external clients cannot connect to it.
For production installations, use the caiman-asr-server-<version>.run release. See instructions in the CAIMAN-ASR server section.
Running the CAIMAN-ASR demo server
If you are setting up the server from scratch you will need to flash the Achronix Speedster7t FPGA with the provided bitstream. If you have a demo system provided by Myrtle.ai or Achronix, the bitstream will already be flashed. See the Programming the card section for instructions on flashing the FPGA.
-
Load the CAIMAN-ASR Demo Server Docker image:
docker load -i docker-asr-demo.tgz -
Start the server with:
./start_server <license directory> [card index]...where
<license directory>is the path to the directory containing your Myrtle.ai licence and[card index]is an optional integer list argument specifying which card indices to use, e.g.0 1 2 3. The default is 0.The demo GUI webpage will then be served at http://localhost.
The latency may be much higher than usual during start-up. Refreshing the webpage will reset the scale on the latency chart.
To shut down the server you can use ctrl+c in the terminal where the server is running.
Alternatively, run the following:
./kill_server
CAIMAN-ASR benchmark
This file describes how to run evaluation of CAIMAN-ASR. Please follow the installation guide for instructions on setup.
Please run all commands from the benchmark directory.
Note on the datasets
The evaluation script uses the LibriSpeech dev-clean dataset. Please refer to benchmarking with custom datasets for instructions on how to use a custom dataset.
Note on using Docker
If you installed using Docker,
you must prepend ./launch.bash to all commands in this file.
CAIMAN-ASR
The script to run CAIMAN-ASR evaluation is transcribe_caiman.py. It is composed of 3 steps which are all performed in sequence. There are however flags to control the flow and skip individual steps.
- Data preparation
- Transcription
- Evaluation
Running the command will perform all 3 steps.
./transcribe_caiman.py --address <ADDRESS> --port <PORT> --run_name <unique name> --append_results caiman-base
And if you installed using Docker, instead run:
./launch.bash ./transcribe_caiman.py --address <ADDRESS> --port <PORT> --run_name <unique name> --append_results caiman-base
where --address is the websocket address of transcription service and --port is the port.
The above command assumes you’re using the CAIMAN-ASR base model. If you want to use the large model, replace --append_results caiman-base with --append_results caiman-large.
Note on client speed
The client simulates a real user by feeding the audio to the server at real time. Since there are several hours of audio, the client will take several hours to run.
To instead do a trial run on just five audio files,
pass the flag --limit_to 5.
Data preparation
This step is essential to run the first time the service is used. It downloads the evaluation audio data, ground truth CTM file, and prepares it all into manifests. There is typically no need to run it again when the user wants to only generate new transcriptions, so the script will automatically skip this step if the data exists.
If you want to redo the data preparation step anyway, pass the --force_data_prep flag.
./transcribe_caiman.py --address <ADDRESS> --port <PORT> --force_data_prep --run_name <unique name> --append_results caiman-base
Transcription
This step runs the transcription step and generates *.caiman-asr.trans transcription files. These are saved directly to the LibriSpeech directory. For each audio file, the script generates one transcription file.
By default, the transcription is skipped for already done audio,
which will happen if you run the script another time with the same run_name.
This behavior can be changed by passing the --force_transcription flag, and all files will be transcribed from scratch and existing transcription files will be overwritten.
./transcribe_caiman.py --address <ADDRESS> --port <PORT> --force_transcription --run_name <name of previous run> --append_results caiman-base
The transcription step can be skipped by running the transcribe_caiman.py and passing the --skip_transcription flag.
./transcribe_caiman.py --address <ADDRESS> --port <PORT> --skip_transcription --run_name <name of previous run> --append_results caiman-base
Evaluation
This step takes generated trans files, aggregates them to a single librispeech-dev-clean.caiman-asr.ctm file, a ground truth CTM file, and computes the word error rate (WER) and latencies. The evaluation step can be skipped by running the transcribe_caiman.py and passing the --skip_evaluation flag.
./transcribe_caiman.py --address <ADDRESS> --port <PORT> --skip_evaluation --run_name <unique name> --append_results caiman-base
Results will also be saved in ~/.cache/myrtle/benchmark/results/[append_results].csv.
Prefix (punctuation/casing)
Use --prefix to condition the RNN-T prediction network:
<pnc>: punctuated and cased output<nopnc>: lowercase only (slightly more accurate)
For example,
./transcribe_caiman.py --address <ADDRESS> --port <PORT> --run_name <unique name> --append_results caiman-base --prefix="<pnc>"
Note: ensure the server is running a model that supports prefix.
Keyword Boosting
CAIMAN-ASR supports keyword boosting of up to 100 keywords. Keyword boosting is a technique to improve the recognition of domain-specific words/phrases and proper nouns, by boosting the probability of specific tokens at inference time.
To provide keywords to the server, use the --keywords argument with a space-separated list of keywords e.g.
./transcribe_caiman.py --keywords caiman asr myrtle
List of arguments
The arguments for transcribe_caiman are as follows:
--address <STRING_VALUE>: Server address the transcription service is running on, default=''.
--port <INT_VALUE>: Port number the transcription service is running on, default=3030.
--force_data_prep: Do the data preparation step even if the data already has been downloaded, default=False.
--force_transcription: Re-transcribe all audio files from scratch, default=False.
--skip_transcription: Skip transcription step and go directly to the evaluation step, default=False.
--skip_evaluation: Skip evaluation step, default=False.
--limit_to <INT_VALUE>: Limit transcription to a number of files. Suitable for testing purposes, default=None.
--run_name <STRING_VALUE>: Name used to identify results.
  Individual transcription files will be saved to `$HOME/.cache/myrtle/benchmark/<run name>`.
--append_results <STRING_VALUE>: Results will be appended to `~/.cache/myrtle/benchmark/results/[append_results].csv`
  Must be one of caiman-base, caiman-large.
--prefix <STRING_VALUE>: Prefix to condition RNN-T prediction network: "<pnc>" or "<nopnc>".
--keywords <STRING_VALUE>: Space-separated list of keywords to be boosted.
Benchmark installation
Follow these installation instructions to run the benchmark scripts in a Linux-based OS.
Install using a virtual environment
(1) Install the basic dependencies:
cd benchmark
sudo ./install_basic_deps.bash
(2) The following command will install the Python dependencies in a virtual environment:
./install_python_deps.bash
Note this requires Python >= 3.10.
If you don’t have the correct version of Python, you can use uv to create the virtual environment with the correct version of Python:
USE_UV=true ./install_python_deps.bash
(3) Launch the virtual environment. All commands are meant to be run inside the environment:
source .venv/bin/activate
Install using Docker
(1) If you do not have docker installed, see here.
(2) Build the benchmarking docker image (takes about 10 minutes):
cd benchmark
./build.bash
Benchmarking CAIMAN_ASR on custom datasets
Data format in JSON
CAIMAN_ASR evaluation runs by default on LibriSpeech dev-clean dataset.
If the user wants to run an evaluation on a custom dataset, they need to generate a JSON manifest with the transcripts and the paths to the audio files in the following format:
    [
        {
        "transcript": "BLA BLA BLA ...",
        "files": [
            {
            "channels": 1,
            "sample_rate": 16000.0,
            "bitdepth": 16,
            "bitrate": 155000.0,
            "duration": 11.21,
            "num_samples": 179360,
            "encoding": "WAV",
            "silent": false,
            "fname": "test-clean/5683/32879/5683-32879-0004.wav"
            }
        ],
        "original_duration": 11.21,
        "original_num_samples": 179360
        },
        ...
    ]
Please refer to the documentation here, specifically the section Convert your dataset to the JSON format for more information.
CTM file
In order to evaluate user-perceived latency, CAIMAN_ASR requires a CTM file, which contains the ground truth of when the speaker finished words. This can be generated according to the instructions here.
See the instructions regarding launching the docker container here,
and run the above command to generate the CTM file with the model config argument as: --model_config configs/testing-1023sp_run.yaml.
Notes on the custom dataset format
- The audio files should be in
WAVformat - The audio files, the JSON manifest and the CTM file should be copied under
$HOME/.cache/myrtle/benchmark/\<custom_dataset_dir>/. - The
JSONmanifest should be named<custom_dataset_name>-wav.json. - The
CTMfile should be named<custom_dataset_name>.wav.ctm. - Please make sure that the audio file paths inside the JSON manifest and the CTM file are relative to the directory where the JSON manifest and the CTM file are stored.
Running the evaluation on custom data
Run the evaluation script according to the instructions in CAIMAN-ASR benchmark with the additional flags:
--data_dir <custom_dataset_dir> --dset <custom_dataset_name>
Versions
Documentation for previous versions: